Table of Contents
- Overview
- Kubernetes Service
- Other Methods to Access the Pods
- Which Approach is the Best for Our Kubernetes on Raspberry Pi?
- Ingress and Ingress Controllers
- Test the Nginx Ingress Controller
- Using HAProxy as External Load Balancer
- Summary
Overview
In this post, we are going to learn how can we use Nginx Ingress Controller to expose container applications running on top of Raspberry Pi Kubernetes cluster.
Before we proceed into the details of Ingress Controllers, it is important to understand the basic concept of how Kubernetes expose the applications (applications running as Pods) to the network. Kubernetes expose Pods to outside world through the Kubernetes Service resource.
Let’s look at what is Kubernetes Service in the next section before we jump into Kubernetes Ingress.
This post is part of the series to cover the details of my initiative to deploy production alike Kubernetes on Raspberry Pi 4. If you miss the previous posts, you can refers them at the following links.
- K8s on RPi 4 Pt. 1 – Deciding the OS for Kubernetes RPi 4
- K8s on RPi 4 Pt. 2 – Proven Steps to PXE Boot RPi 4 with Ubuntu
- K8s on RPi 4 Pt. 3 – Installing Kubernetes on RPi
- K8s on RPi 4 Pt. 4 – Configuring Kubernetes Storage
Kubernetes Service
When you deploy your container application as Pod in Kubernetes cluster, it is only accessible from within the Pod itself.
Kubernetes provides Service resource as an abstraction layer to define an access to the application services inside the Pod.
This Service provides an approach that you can define policies of how do you want to expose your Pods into the network. It also acts as an internal load balancer to allow a seamless access to the multiple similar Pods (serving the same application service).
There are a few service types that we can choose to expose the Pods network.
ClusterIP
ClusterIP exposes the service on cluster-internal IP. This is the default service type. This type of service only allows the service accessible from within the Kubernetes cluster network.
The following YAML sample shows a typical configuration for a Kubernetes service. If the “spec.type” is omitted in the YAML content the default ClusterIP type will be created.
apiVersion: v1
kind: Service                  # the type of Kubernetes resource. In here is Service
metadata:
  name: hello-world-service    # name the service
spec:
  ports:
  - port: 8080                 # the port to be exposed as service for the Pod
    protocol: TCP
    targetPort: 80             # Target port. This is the port the application is listening
  selector:
    run: hello-world           # use selector to map this service to the respective Pod(s)
In the above example, we expose a service named “hello-world-service” at port “8080”. The traffics outside of Pod are mapped from port “8080” into internal port “80”.
NodePort
NodePort exposes the service on each of the node’s IP at a static port while utilizing the ClusterIP.
Using the same example from the previous YAML content, you need to explicitly set the “spec.type” to the value “NodePort” in order to create NodePort type Kubernetes Service.
The following is an example of NodePort Service.
apiVersion: v1
kind: Service
metadata:
  name: hello-world-service
spec:
  ports:
  - port: 8080
    protocol: TCP
    targetPort: 8080
    nodePort: 30007     # Optional. k8s allocates a port dynamically between 30000-32767 if omitted.
  selector:
    run: hello-world
  type: NodePort        # Indicates this is NodePort type
The following shows the details of the created NodePort Service.
$ kubectl describe svc hello-world-service

Name:                     hello-world-service
Namespace:                test
Labels:                   <none>
Annotations:              <none>
Selector:                 run=hello-world
Type:                     NodePort
IP Family Policy:         SingleStack
IP Families:              IPv4
IP:                       10.106.116.77
IPs:                      10.106.116.77
Port:                     <unset>  8080/TCP
TargetPort:               80/TCP
NodePort:                 <unset>  31096/TCP
Endpoints:                10.244.3.10:8080,10.244.3.9:8080
Session Affinity:         None
External Traffic Policy:  Cluster
Events:                   <none>
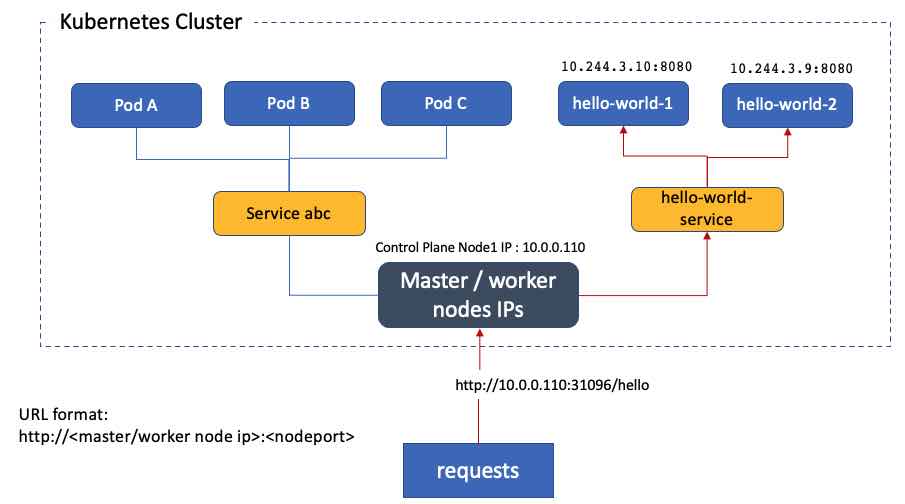
The following diagram illustrates how the Kubernetes NodePort works. You can access the respective application service (Pod) through any Kubernetes node public IP address with the matching nodePort. You can use any available node IP address.
From the example above, the NodePort for HTTP protocol is assigned with port number “31096”, thus you can access the “hello-word-service” at “http://10.0.0.110:31096/”.

LoadBalancer
LoadBalancer exposes the service externally using a cloud provider’s load balancer.
The cloud providers that support this service type automatically provision a load balancer when the Service is created. This external load balancer will then route the traffics to the NodePort or ClusterIP. The NodePort or ClusterIP are created automatically by Kubernetes.
The following shows a YAML example of Kubernetes Service with type of LoadBalancer.
apiVersion: v1
kind: Service
metadata:
  name: hello-service
spec:
  selector:
    run: hello-world
  ports:
    - protocol: TCP
      port: 8080
      targetPort: 8080
  clusterIP: 10.0.171.239
  type: LoadBalancer
status:
  loadBalancer:
    ingress:
    - ip: 192.0.2.127     # The load balancer IP. Injected after the load balancer is created.
ExternalName
ExternalName maps the service to the contents of the externalName field by returning a CNAME record with its value. What it does is routing the service to the DNS name configured.
apiVersion: v1
kind: Service
metadata:
  name: my-service
  namespace: prod
spec:
  type: ExternalName
  externalName: database.internal      # Resolvable DNS name pointing to external service
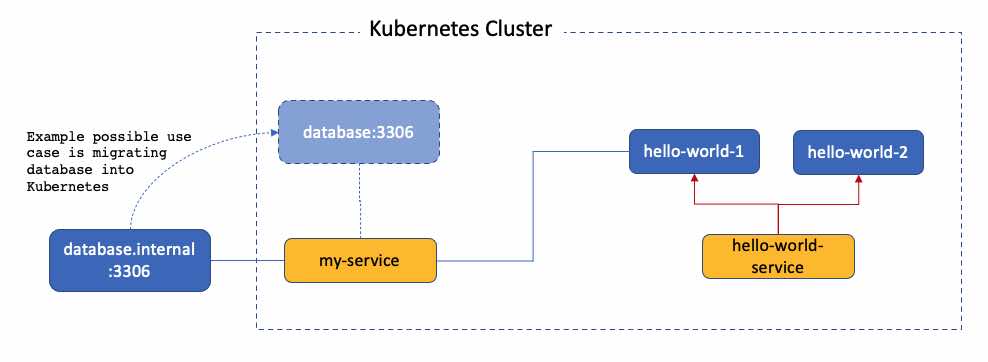
From the diagram above, you can see that ExternalName is just a service type that allow you to connect to external service using the Kubernetes Service. It is not meant to expose internal applications to outside world.
One of the use case is we can migrate the database that is running outside into Kubernetes cluster without affecting the current applications that are connecting to the database. In this case, you do not need to change the configuration of “hello-world” application but only need to modify the service configuration in the “my-service”.
Other Methods to Access the Pods
Port Forwarding
You can use Kubernetes port forwarding to temporary map the port from the application pod to your local computer. You need kubectl command to do this. You will need to authenticate to Kubernetes admin API in order to use the kubectl command.
$ kubectl port-forward hello-world-569cb64d99-5h75p 8080:8080
Forwarding from 127.0.0.1:8080 -> 8080
Forwarding from [::1]:8080 -> 8080
Handling connection for 8080
In the above example, the command performs a port forwarding from “hello-world” Pod on port 8080 to local computer at 127.0.0.1 at port 8080. You can now access to the “hello-world” webpage on your browser at http://127.0.0.1:8080.
You need to perform multiple port forwarding if you have multiple Pods. I do says it is temporary because the connection lost once the command is terminated.
Port forwarding is only suitable for troubleshooting or testing. It is not a production solution we are looking for.
Note: Port forwarding does not require Kubernetes Service, it is a direct port forwarding to the Pod itself.
Kubernetes Proxy
You can use the kubectl to access the Kubernetes adminAPI to access to the application REST API interfaces. This approach requires an authenticated user in order to use the kubectl command.
You need to change your service resource definition to name your port if you have not done so.
apiVersion: v1
kind: Service
metadata:
  name: hello-world-service    # service name
spec:
  ports:
  - port: 8080
    name: http                 # name the port
    protocol: TCP
    targetPort: 8080
  selector:
    run: hello-world
Next, you can start a proxying session by running the following command.
kubectl proxy --port 8080You can request the Kubernetes service using the following URL format.
http://127.0.0.1:<proxied-port>/api/v1/namespaces/<namespace>/services/<service_name>:<port_name>/proxy/Using the “hello-world-service” example, you can access the “/hello” API path using the following URL.
curl http://127.0.0.1:8080/api/v1/namespaces/test/services/hello-world-service:http/proxy/helloIt seems obvious that Kubernetes Proxy is only good for troubleshooting and administration purposes.
Which Approach is the Best for Our Kubernetes on Raspberry Pi?
Let’s get back to the focus on this post. How can we expose the Kubernetes application services in Raspberry Pi?
Obviously LoadBalancer is not suitable because I do not have a load balancer that supports the Kubernetes Service configuration out of box.
On the other hand, the ExternalName service type will not be able to expose the application services for the Kubernetes cluster.
At this junction, you realize that you are running out of good option.
You need a flexible, easy to maintain and cost effective approach to expose your Kubernetes services.
This is where the Kubernetes Ingress come to rescue. Let’s proceed to the next section for more details.
Ingress and Ingress Controllers

What is Ingress?
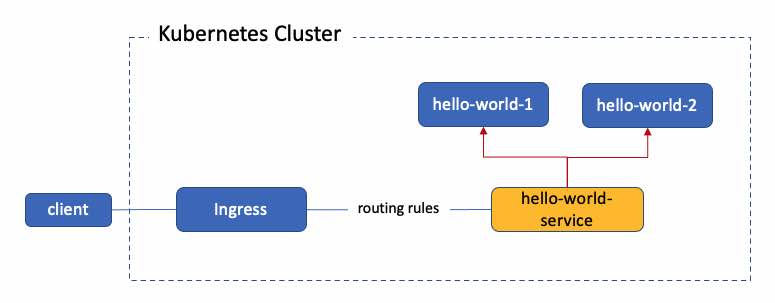
Ingress is not a Kubernetes Service. Ingress provides specification for different vendors to provide the Ingress implementation via the Ingress Controller. Ingress resource provides HTTP and HTTPS traffic routing from outside the cluster to services within the Kubernetes cluster. Ingress resource provides rules to define and control the traffics routing.
An Ingress may be configured to give services externally-reachable URLs, load balance traffic, terminate SSL / TLS, and offer name-based virtual hosting.
What is Ingress Controllers?
As mentioned in the above, Ingress itself will not work without the Ingress Controller. An Ingress controller is responsible for fulfilling the Ingress, usually with a load balancer, though it may also configure your edge router or additional frontends to help handle the traffic.
Ingress Controller is not installed by default. You can choose the provider that you wish to install on Kubernetes. You can find a list of other Ingress Controller providers here.
For the Kubernetes on Raspberry Pi 4, I am using Nginx Ingress Controller. Let’s look at Nginx Ingress Controller in more detail at the next sections.
Nginx Ingress Controller
Nginx Ingress Controller is based on open source Nginx as a reverse proxy and load balancer. You can find the project at the GitHub and the documentation at here. Nginx Ingress Controller is part of the Kubernetes as a project supports and maintains Nginx ingress controllers.
Installing Nginx Ingress Controller
To install Nginx Ingress Controller for Raspberry Pi Kubernetes, we will use the bare metal installation approach.
You can install the Nginx Ingress Controller using the following command. The YAML will create a “ingress-nginx” namespace and deploy the components in this namespace.
kubectl apply -f https://raw.githubusercontent.com/kubernetes/ingress-nginx/controller-v1.1.0/deploy/static/provider/baremetal/deploy.yamlBefore you proceed to install the Nginx Ingress Controller, it is always good to find out the latest version number supported by your Kubernetes version at the GitHub. Install the latest stable version if possible.
With a successful command execution, you should be able to see results similar to the following.
$ kubectl get all -n ingress-nginx

NAME                                            READY   STATUS    RESTARTS   AGE
pod/ingress-nginx-controller-7b47bdc9cd-h74nr   1/1     Running   0          16d

NAME                                         TYPE        CLUSTER-IP      EXTERNAL-IP                   PORT(S)                      AGE
service/ingress-nginx-controller             NodePort    10.69.222.13    10.0.0.113,10.0.0.114   80:32132/TCP,443:31342/TCP   37d
service/ingress-nginx-controller-admission   ClusterIP   10.100.59.10   <none>                        443/TCP                      37d

NAME                                       READY   UP-TO-DATE   AVAILABLE   AGE
deployment.apps/ingress-nginx-controller   1/1     1            1           37d

NAME                                                  DESIRED   CURRENT   READY   AGE
replicaset.apps/ingress-nginx-controller-5998b9c8df   0         0         0       35d
replicaset.apps/ingress-nginx-controller-7b47bdc9cd   2         2         2       16d
replicaset.apps/ingress-nginx-controller-7b74cbbc5    0         0         0       25d
A Kubernetes service “ingress-nginx-controller” is created with NodePort type. The NodePort is dynamically assigned when it is created.
From the example, port “32132” is mapped to HTTP port “80”, port “31342” is mapped to HTTPS port “443”. The Nginx Ingress Controller will route any external traffic to this NodePort.
Note: You can configure a fixed nodePort instead of a dynamic allocated port number. You can make a copy of “ingress-nginx-controller” Service resource configuration from the “deploy.yaml” and create a new YAML file. You can then hardcode the nodePort in the YAML file and use kubectl apply to make the changes to the existing “ingress-nginx-controller” service.
Test the Nginx Ingress Controller
Once we have the Nginx Ingress Controller deployed successfully, we can now proceed to perform a quick test to make sure our configuration works as expected.
Deploy a Sample Application
Let’s create a “test” namespace.
kubectl create ns testLet’s deploy a sample “hello-world” application using the following YAML. This will pull a sample “hello-world” application container image and deploy it on Kubernetes.
apiVersion: apps/v1
kind: Deployment
metadata:
  name: hello-world
spec:
  selector:
    matchLabels:
      run: hello-world
  replicas: 1
  template:
    metadata:
      labels:
        run: hello-world
    spec:
      containers:
        - name: hello-world
          image: chengkuan/helloworld
          ports:
            - containerPort: 8080
              protocol: TCP
# Assuming you have the above content in hello-world.yaml
# Run the following command to deploy the Pod.
kubectl apply -f hello-world.yamlCreate a port forwarding to test the Pod locally before we proceed further.
# Create a port forwarding ... double check the ports are correct
$ kubectl port-forward $(kubectl get pod -l run=hello-world -o jsonpath="{.items[0].metadata.name}") 8080:8080

# Test the Pod and expects a return of "Hello World" string
$ curl http://127.0.0.1:8080/hello
Hello World
Let’s proceed to expose a service for the deployment. Using this command will create a Kubernetes Service with the similar name as the Deployment resource.
$ kubectl expose deployment hello-world -n test

$ kubectl describe svc hello-world
Name:              hello-world
Namespace:         test
Labels:            <none>
Annotations:       <none>
Selector:          run=hello-world
Type:              ClusterIP
IP Family Policy:  SingleStack
IP Families:       IPv4
IP:                10.97.72.15
IPs:               10.97.72.15
Port:              <unset>  8080/TCP
TargetPort:        8080/TCP
Endpoints:         10.244.3.21:8080
Session Affinity:  None
Events:            <none>
Create the Ingress Resource
Let’s create a YAML file with the following content and named it as “hello-world-ingress.yaml”.
We are using “hello-world.kube.internal” as the hostname. This is the DNS hostname that is reachable from my home network.
This DNS name should be configured as “A” record that resolving to one of the “EXTERNAL-IP” of the Nginx Ingress Controller Service (they are also the worker nodes IP address). In our example these IP addresses are 10.0.0.113 and 10.0.0.114.
apiVersion: networking.k8s.io/v1
kind: Ingress
metadata:
  name: hello-world-ingress
  namespace: test                       # hardcoded the namespace here
spec:
  ingressClassName: nginx               # This value must be the 'nginx'
  rules:
  - host: "hello-world.kube.internal"   # This is the DNS name we are giving to the hello-world apps
    http:
      paths:
      - path: /                         # Map to the root context
        pathType: Prefix
        backend:
          service:
            name: hello-world           # The hello-world service name created previously
            port:
              number: 8080              # The port number for the service.
You can verify the DNS name is working by checking using the following command. The command output should be the worker node IP address you have configured at the DNS server.
$ dig hello-world.kube.internal +short
10.0.0.113
Proceed to create the Ingress resource in the “test” namespace.
$ kubectl apply -f hello-world-ingress.yamlLet’s query the “hello-world” by using the DNS name and the Nginx Ingress Controller service nodePort. We are using nodePort for HTTP protocol which is “32132”.
$ curl http://hello-world.kube.internal:32132/hello
Hello World
With the similar approach, you can add endless number of DNS hostnames for countless applications Pods that are running in your Kubernetes cluster.
By now you should be able to see why Ingress is flexible, convenient and cost effective. With proper configured DNS hostname and Ingress rules, the Nginx Ingress Controller will take care of all the internal traffics routing.
There are so many other use cases that you can implement using Ingress rules. You can refer to Nginx Ingress Controller user guide and examples for more details.
Using HAProxy as External Load Balancer
Since the Nginx Ingress Controller is crucial to provide the Ingress management and control, it is important to make sure the Nginx Ingress Controller is configured as highly available. This can be achieved with at least 2 Pods and at least 2 worker nodes.
We can increase the number of Pod by configuring the replicas using the following command.
kubectl scale --replicas=2 deployment ingress-nginx-controllerKubernetes control plane will decide how to deploy these 2 Pods across the 2 worker nodes that we have here. In order to provide the load balancing for these 2 worker nodes, we need an external load balancer. This is where the HAProxy comes into the picture.

In this scenario, I am using a HAProxy containers. You can proceed to use non-container environment if you wish. I deploy the HAProxy containers onto 2 Raspberry Pi outside of Kubernetes cluster. You can see this illustrated in the diagram above.
I also configured Keepalived to load balance these 2 Raspberry Pi. I will not cover the configuration here but you can refer to this website for how to setup Keepalived.
Note: There is a beta version of MetalLB for Kubernetes bare metal load balancer. If you are experimenting the Kubernetes on bare metal, you probably want to try this out.
Custom HAProxy Container
You does not need to build HAProxy container from scratch. It is available from Docker Hub. It does support arm64.
We are doing a simple custom build here.
Why we need to custom build the container is because we need to be able to provide a configuration file to the container. We also want to define a volume for the configuration directory so that we can easily change the configuration without rebuild the container again.
Note: I know there are other ways to do this. Let’s just stick to using volume here.
Creating the Dockerfile
The following is the Dockerfile that you can use.
FROM haproxy:latest

VOLUME [ "/usr/local/etc/haproxy" ]
COPY haproxy.cfg /usr/local/etc/haproxy/haproxy.cfg
Creating haproxy.cfg File
You will need to create seed configuration file named “haproxy.cfg” in the same directory as the Dockerfile above.
You will define a frontend for HTTP traffics.
frontend kube-ingress-insecured
  bind *:8080                              # bind all address on port 8080
  mode http                                # for http protocol
  option httplog
  default_backend nginx-ingress-insecured  # specify the default backend
Next, you will define a HAProxy backend. Please note that the port is pointing to the non-secured nodePort which is “32132”.
backend nginx-ingress-insecured
  balance roundrobin
  mode http
  # the worker node IP and Nginx Ingress Controller NodePort for each worker node.
  server nginx0 10.0.0.113:32132 check
  server nginx1 10.0.0.114:32132 check
I did not share the detail of the HAProxy configuration for the Kubernetes adminAPI in my earlier posts. You can refer it at the following.
Since adminAPI is using TLS, we need to configure the TLS traffics as per the following for the frontend
frontend kube-api
  bind *:6443                      # The default adminAPI TLS port
  mode tcp
  option tcplog
  default_backend kube-controllers # default backend
The backend for adminAPI
backend kube-controllers
  balance roundrobin
  mode tcp
  # load balance to control planes
  server master0 10.0.0.110:6443 check
  server master1 10.0.0.112:6443 check
  server master2 10.0.0.113:6443 check
So far our sample application is running on HTTP protocol. If you have TLS/HTTPS traffics, you can configure the following for TLS pass-through.
frontend external_traffics
  bind *:443
  mode tcp
  option tcplog
  acl acl_secured_site req_ssl_sni -i secure-site.internal
  use_backend nginx-ingress-secured if acl_secured_site
The backend for the HTTPS traffics. Please note that the port is referring to the secured nodePort “31342”.
backend nginx-ingress-secured
  balance source
  mode tcp
  server nginx0 10.0.0.113:31342 check
  server nginx1 10.0.0.114:31342 check
Build the HAProxy Container
Once everything is in place, you can proceed to build the container. If you intend to run the container on Raspberry Pi, you need to leverage on multi-arc to build a container for arm64 architecture.
Let’s create a multi-arc profile
docker buildx create --name mybuilderRun the following command to use the newly created profile.
docker buildx use mybuilderBootstrap the builder.
docker buildx inspect --bootstrapYou should observer similar outcome as per the following
Outcome:

    ```
    [+] Building 1.2s (1/1) FINISHED
    => [internal] booting buildkit                                                                                                                                                                                                       1.2s
    => => starting container buildx_buildkit_mybuilder0                                                                                                                                                                                  1.2s
    Name:   mybuilder
    Driver: docker-container

    Nodes:
    Name:      mybuilder0
    Endpoint:  unix:///var/run/docker.sock
    Status:    running
    Platforms: linux/amd64, linux/arm64, linux/riscv64, linux/ppc64le, linux/s390x, linux/386, linux/mips64le, linux/mips64, linux/arm/v7, linux/arm/v6
At the directory same as the Dockerfile, run the following command to build the container and push to container registry.
docker buildx build --platform linux/arm/v7,linux/arm64,linux/amd64 -t chengkuan/haproxy:latest --push .Building multiple architectures container will take longer time during the first build. If you want to have shorter build time, you can just build the architecture that you need by taking out the architecture flags from the “–platform” parameter.
Note: It is recommended to push the container image to a container registry. This will make the container images management easier when you have more container images over the time. For personal use, a simple solution is to use Docker Hub.
Deploying HAProxy
Once you have the container built, you can run the container using the following command
sudo docker run -d chengkuan/haproxy:latestYou can always change the haproxy.cfg at the local path (Mountpoint) referred by the container volume.
# Find out the name of the volume
$ sudo docker volume ls
local     haproxy_config

# Find out the location of the local path
$ sudo docker volume inspect haproxy_config
[
    {
        "CreatedAt": "2022-01-07T08:52:24Z",
        "Driver": "local",
        "Labels": {
            "com.docker.compose.project": "haproxy",
            "com.docker.compose.version": "1.27.4",
            "com.docker.compose.volume": "config"
        },
        "Mountpoint": "/var/lib/docker/volumes/haproxy_config/_data",
        "Name": "haproxy_config",
        "Options": null,
        "Scope": "local"
    }
]
Update the DNS A Record
Now you need to proceed to change the DNS record “hello-world.kube.internal” to point to the HAProxy IP address. In my case I have setup Keepalived for 2 HAProxy. The virtual IP address is 10.0.0.12, which is configured for “hello-world.kube.internal”.
Note: I simplified a lot of the steps for HAProxy setup in here. I notice the post has becoming too long. If you wish to know more on this part of setup. Please leave a comment so that I can reply to you if you have any question.
Summary
Using Nginx Ingress Controller is not as complicated as it is thought. In this post, we have learned how to install the Nginx Ingress Controller for Raspberry Pi Kubernetes and configured a simple Ingress resource to expose the application Pod.
Nginx Ingress Controller comes with many powerful features that you can control and manage the Pod traffics using the Ingress rules which are not covered in this post. Once you have familiarized on using the Nginx Ingress Rules, I urge you to explore more.
This post concludes the series of running Kubernetes on Raspberry Pi 4.
I will definitely running more applications on this Kubernetes cluster. Stay tuned for more posts in the future.

