
This article is part of series of articles based on the Payment Gateway use case.
For all the other articles regarding Payment Gateway use case, please refer to the References section at the bottom of this article.
Refers to the GitHub for how to deploy the complete demo.
Table of Contents
- Overview
- Make Changes to Yaml Files
- Installing Red Hat ServiceMesh on OpenShift
- Installing Red Hat ServiceMesh Operator
- Installing All-In-One ServiceMesh Control Plane
- Adding Member Project
- Create Route for customer-ui Service
- Change RHSSO Client for The New customer-ui Route
- Create The Istio Gateway, Virtual Service and Destination Rules
- Bypass Istio Policies for Non-ServiceMesh Applications
- Accessing The ServiceMesh
- Summary
- References
Overview
Based on the open source Istio project, Red Hat OpenShift Service Mesh adds a transparent layer on existing distributed applications without requiring any changes to the service code. You add Red Hat OpenShift Service Mesh support to services by deploying a special sidecar proxy throughout your environment that intercepts all network communication between microservices. You configure and manage the service mesh using the control plane features.
Red Hat OpenShift Service Mesh provides an easy way to create a network of deployed services that provides discovery, load balancing, service-to-service authentication, failure recovery, metrics, and monitoring. A service mesh also provides more complex operational functionality, including A/B testing, canary releases, rate limiting, access control, and end-to-end authentication.
An installation of Red Hat OpenShift Service Mesh differs from upstream Istio community installations in multiple ways. The modifications to Red Hat OpenShift Service Mesh are sometimes necessary to resolve issues, provide additional features, or to handle differences when deploying on OpenShift Container Platform. Please refer Comparing Service Mesh and Istio for more details.
Make Changes to Yaml Files
Good thing about using Red Hat ServiceMesh is I do not need to make any source code change to my current microservice applications. However, I am seeing the direction to use Deployment instead of DeploymentConfig. So I decided to take this chance to convert all my yaml files content to use Deployment, as it is considered a first class citizen now both in OpenShift and Kubernetes. I also need to modify the existing yaml files content to turn on support/features for ServiceMesh. That’s the only changes I need to make in order to enable my Payment Gateway microservice applications for ServiceMesh.
I also make some changes to the existing yaml files to ensure they follow the Istio requirements.
Convert DeploymentConfig to Deployment
The changes in this section are only required if you are using DeploymentConfig. You may skip to the next section if you are already using Deployment.
According to the OpenShift documentation, some of the features in DeploymentConfig are not available in Deployment such as triggers, deployment strategy syntax and etc.
Let’s review the changes made by using the template/accountprofile-template.yaml as an example.
Change from DeploymentConfig to Deployment:
# The following are replaced with the next 2 lines for Deployment type
# - apiVersion: apps/v1
#  kind: Deployment
- apiVersion: apps/v1
  kind: Deployment
Change the .spec.selector to the following syntax:
# Replaced the following lines with the new lines below
#    selector:
#      name: ${APPLICATION_NAME}-mongodb
    selector:
      matchLabels:
        app: ${APPLICATION_NAME}-mongodb
There is no change require for the deployment strategy for MongoDB since the syntax for Recreate strategy is the same for both. But if you are using Rolling Update strategy, you will need to change the .spec.strategy.type from Rolling to RollingUpdate in Deployment.
Remove any other syntax that are not part of Deployment if there is any.
Make Changes for Istio Enablement
Again, let’s use the template/accountprofile-template.yaml as an example.
The Deployment section is updated with the following syntax.
sidecar.istio.io/inject: “true” is used to indicate that we would like Istio to inject the sidecar for this deployment. On top of that, I also added version label. This is a required label for us to configure Istio policy later. For example this will be used for the DestinationRule in Istio configuration.
template:
      metadata:
        labels:
          app: ${APPLICATION_NAME}-mongodb
          version: ${APP_VERSION}
          pgw-istio: 'true'
        annotations:
          sidecar.istio.io/inject: "true"
For the above configuration, notice I also added pgw-istio: ‘true’. I will come to this in the later part of this article.
Make sure your service section looks like the following. Ensure the .spec.selector matching the Deployment section. The .spec.ports[0].name using the predefined name from this list in order for Istio to provide additional capabilities, such as routing and rich metrics. If there are multiple ports with the same protocol, <protocol><-prefix> naming convention can be used.
- apiVersion: v1
  kind: Service
  metadata:
    labels:
      app: ${APPLICATION_NAME}-mongodb
    name: ${APPLICATION_NAME}-mongodb
  spec:
    ports:
    - name: tcp
      port: 27017
      protocol: TCP
      targetPort: 27017
    selector:
      app: ${APPLICATION_NAME}-mongodb
    sessionAffinity: None
    type: ClusterIP
Verify the following in the Deployment section for .spec.template.spec.container[0].env. Make sure all the ports configured at the following sections are matching the service section above if you would like to properly expose the ports.
          ports:
          - containerPort: 27017
            protocol: TCP
Another change that I have made to Payment Gateway yaml files is to remove the BuildConfig because Deployment does not support –allow-missing-imagestream-tags=true parameter at oc new-app command line. Deployment expects the container image is available in OpenShift before oc new-app command is called. So instead of using BuildConfig, I change to use oc new-build as per the following example.
# create a new buildconfig in OpenShift
oc new-build -n $APPS_NAMESPACE -e MAVEN_MIRROR_URL=http://nexus3-paygate-tools.apps.cluster-spore-7e54.spore-7e54.sandbox1254.opentlc.com/repository/maven-all-public/ -i redhat-openjdk18-openshift:1.4 --labels='app=accountprofile,app-group=accountprofile' --name='accountprofile' --to='accountprofile:latest' --binary=true

# Start container image build from source codes.
oc start-build accountprofile --from-file=../tmp/accountprofile/ -n $APPS_NAMESPACE --wait
Specific Changes to Red Hat Fuse Service Deployment
Typical way to deploy Red Hat Fuse service is to run the following command to build and deploy the Camel service to OpenShift. This approach deploys Camel service using DeploymentConfig.
mvn clean install fabric8:deployBut this is not suitable for ServiceMesh which we need to use Deployment. So I had created the OpenShift template in yaml format. Use the following command to first build and create the imagestream in OpenShift.
mvn clean install fabric8:buildThen, run the following command to create the Deployment.
oc new-app -n $APPS_NAMESPACE -f ../../templates/customerservice-template.yamlInstalling Red Hat ServiceMesh on OpenShift
Installing Red Hat ServiceMesh Operator
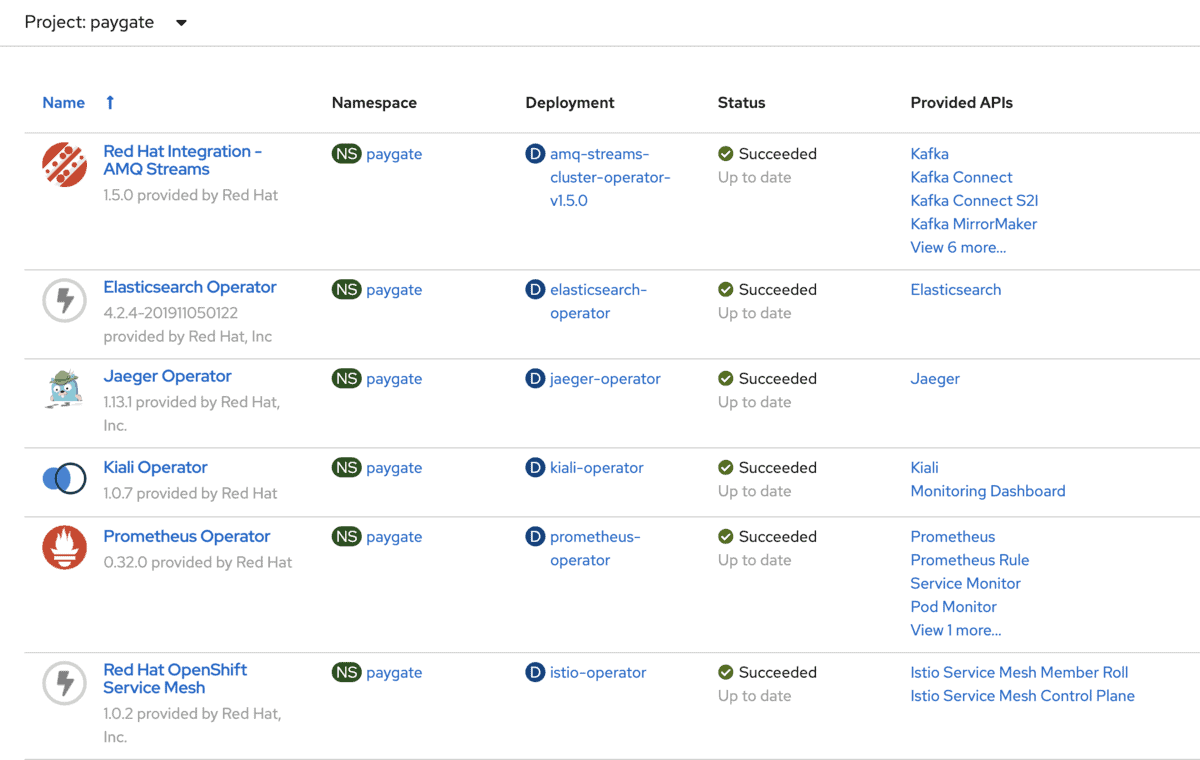
Installing ServiceMesh Operator is made easier by just using the OpenShift OperatorHub. You will need to have the following Operators installed before installing ServiceMesh Operator.
Once you have the above Operators installed, proceed to install the ServiceMesh Operator from OpenShift OperatorHub. Refer this documentation for the details.
The operator also install and preconfigured Prometheus and Grafana at the same time.
The following shows the installed Operators in the application OpenShift project.
Installing All-In-One ServiceMesh Control Plane
I am installing an all-in-one ServiceMesh control plane. You may customise the installation following this guide. The following shows the yaml content.
You may change ior_enabled to true if you would like OpenShift to auto create the OpenShift Routes for all the host names listed in the Istio Gateway config file. Refer Automatic Route Creation for more detail.
apiVersion: maistra.io/v1
kind: ServiceMeshControlPlane
metadata:
  name: basic-install
  namespace: istio-system
spec:
  version: v1.1
  istio:
    gateways:
      istio-egressgateway:
        autoscaleEnabled: false
      istio-ingressgateway:
        autoscaleEnabled: false
        ior_enabled: false
    mixer:
      policy:
        autoscaleEnabled: false
      telemetry:
        autoscaleEnabled: false
    pilot:
      autoscaleEnabled: false
      traceSampling: 100
    kiali:
      enabled: true
    grafana:
      enabled: true
    tracing:
      enabled: true
      jaeger:
        template: all-in-one
Run the following command to install ServiceMesh control plane. It is recommended to install this control plane in a separate OpenShift project than the existing application project. It will take some time for Istio control plane service to be ready. Proceed to the next section when all the Istio control plane services are up and ready.
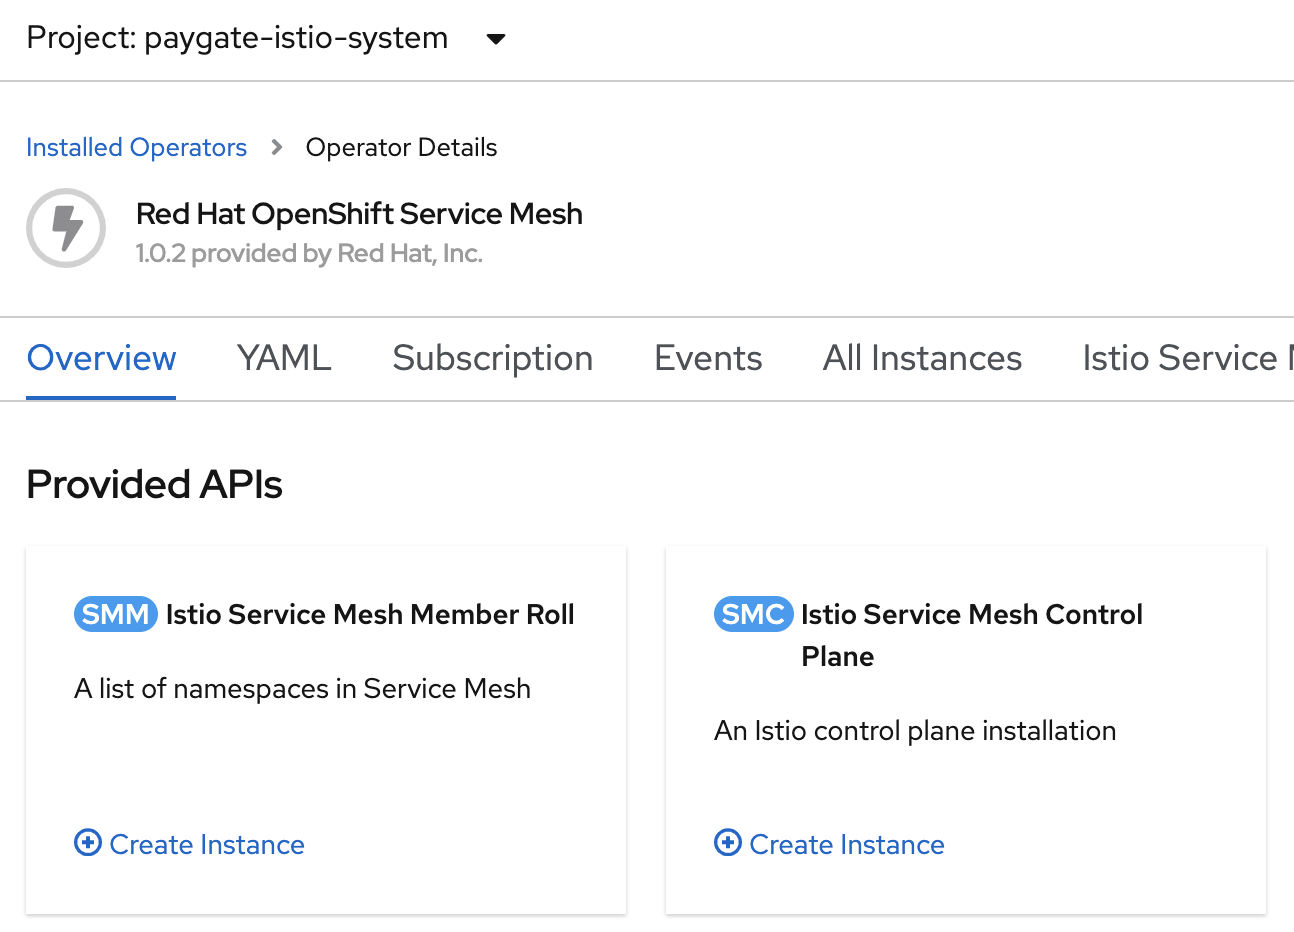
oc create -n $ISTIO_SYSTEM_NAMESPACE -f ../tmp/istio/istio-installation.yamlYou may also use the OpenShift console to install the ServiceMesh control plane into your chosen OpenShift project as per the following screen shot.
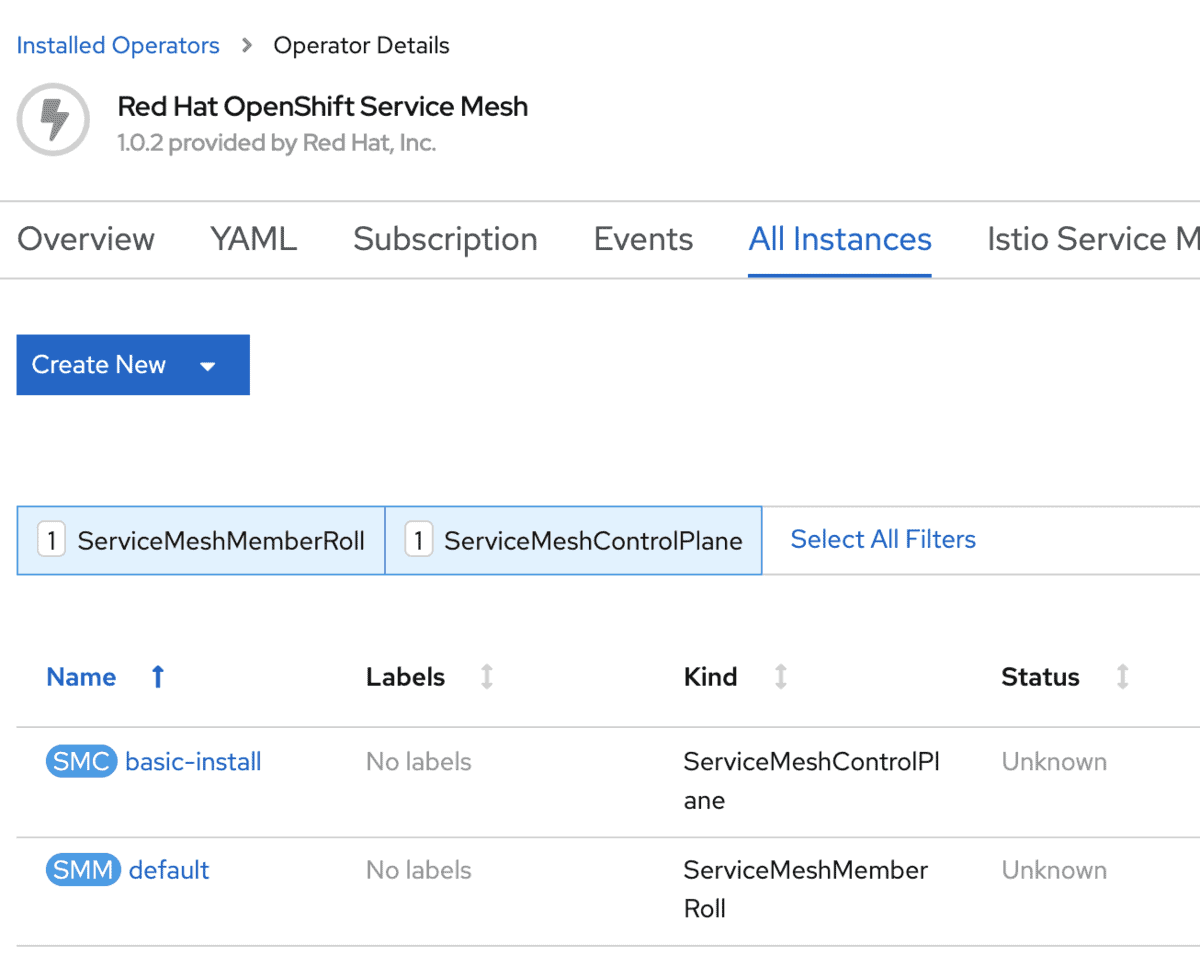
The following shows the installed ServiceMesh Control Plane instance.
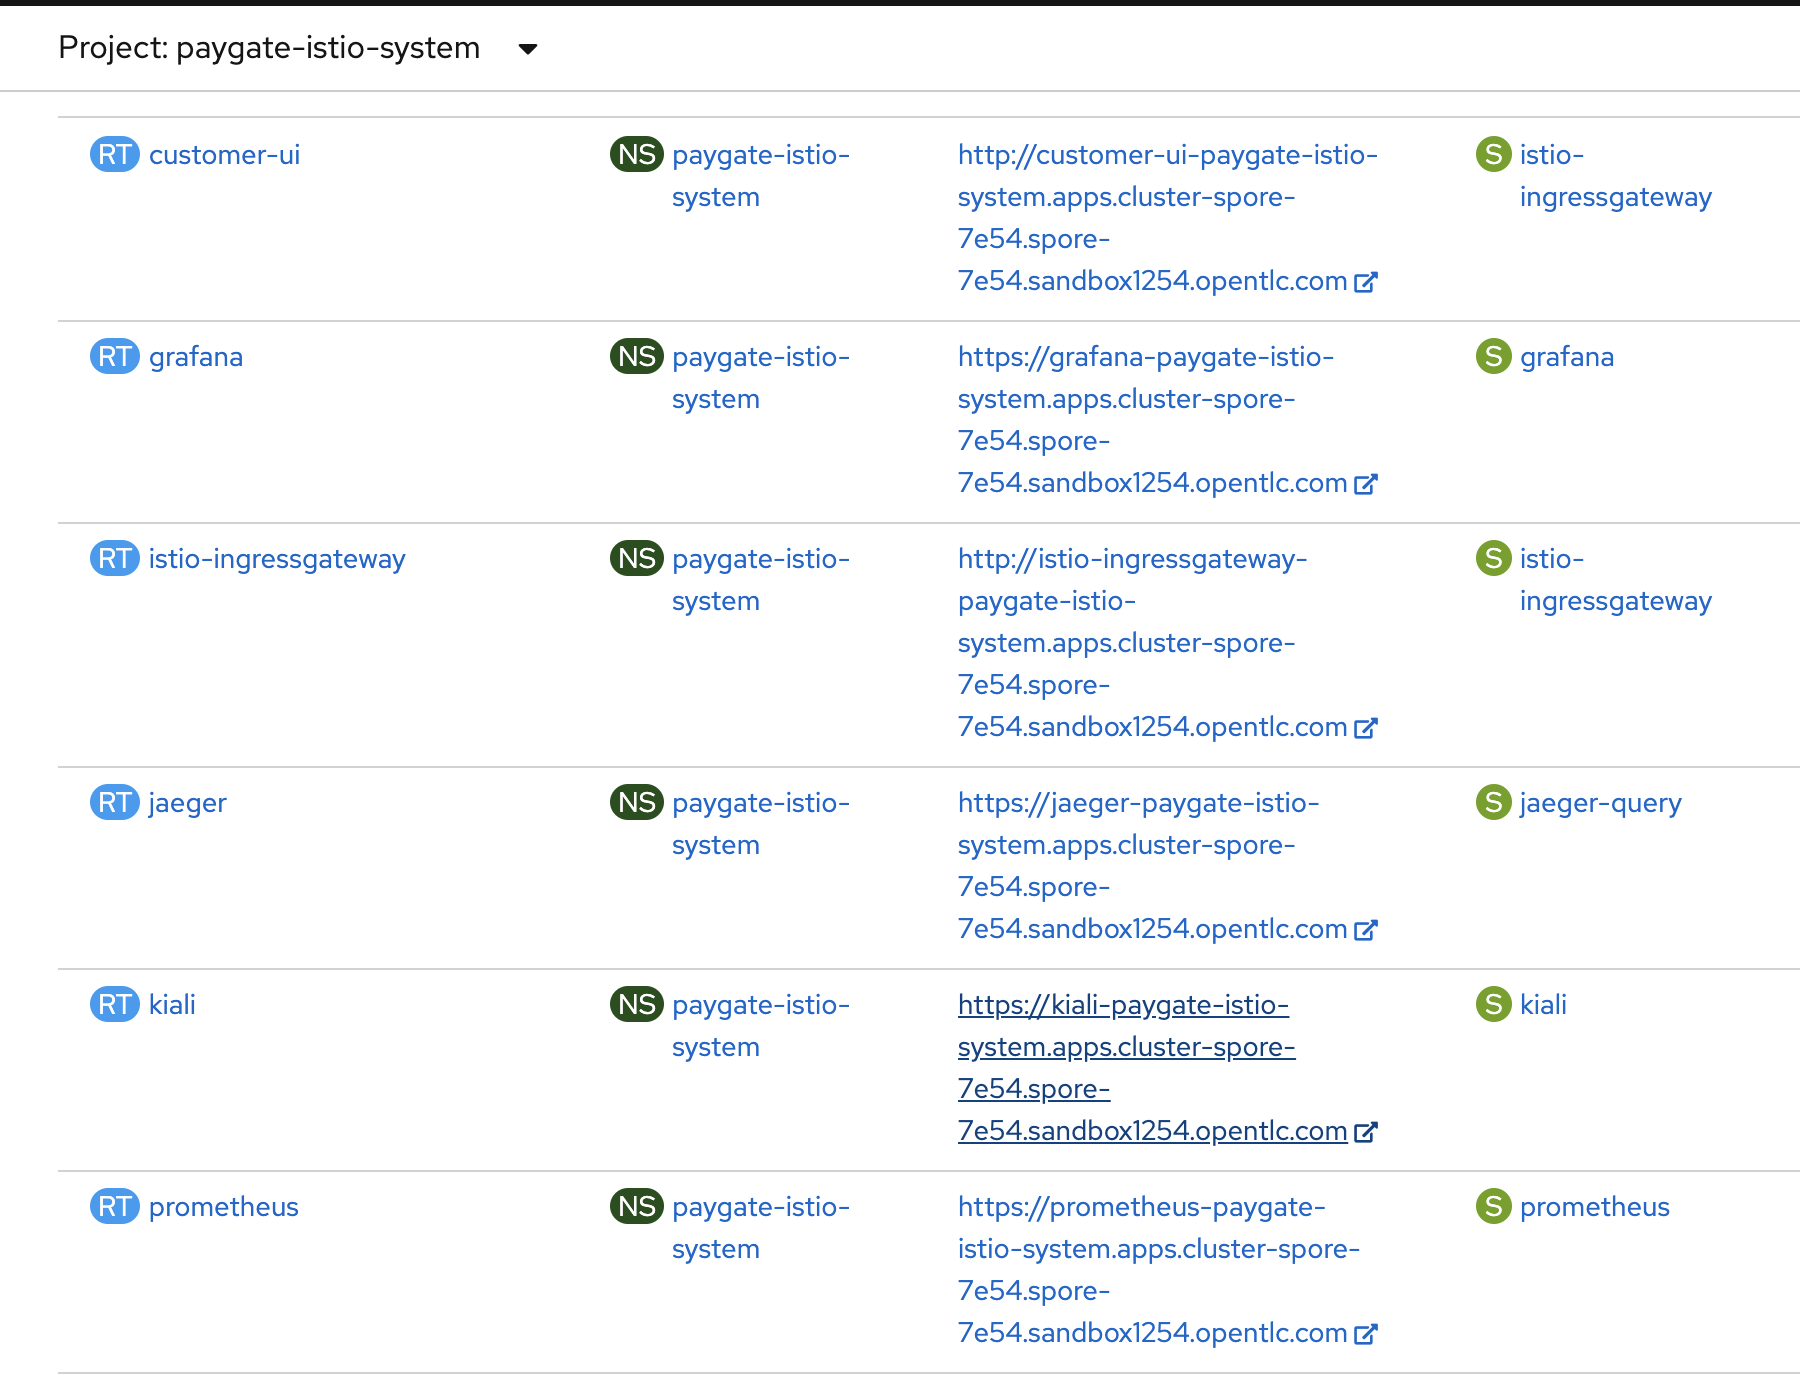
The following shows the created OpenShift routes in the ServiceMesh control plane OpenShift Project after ServiceMesh control plane installation.
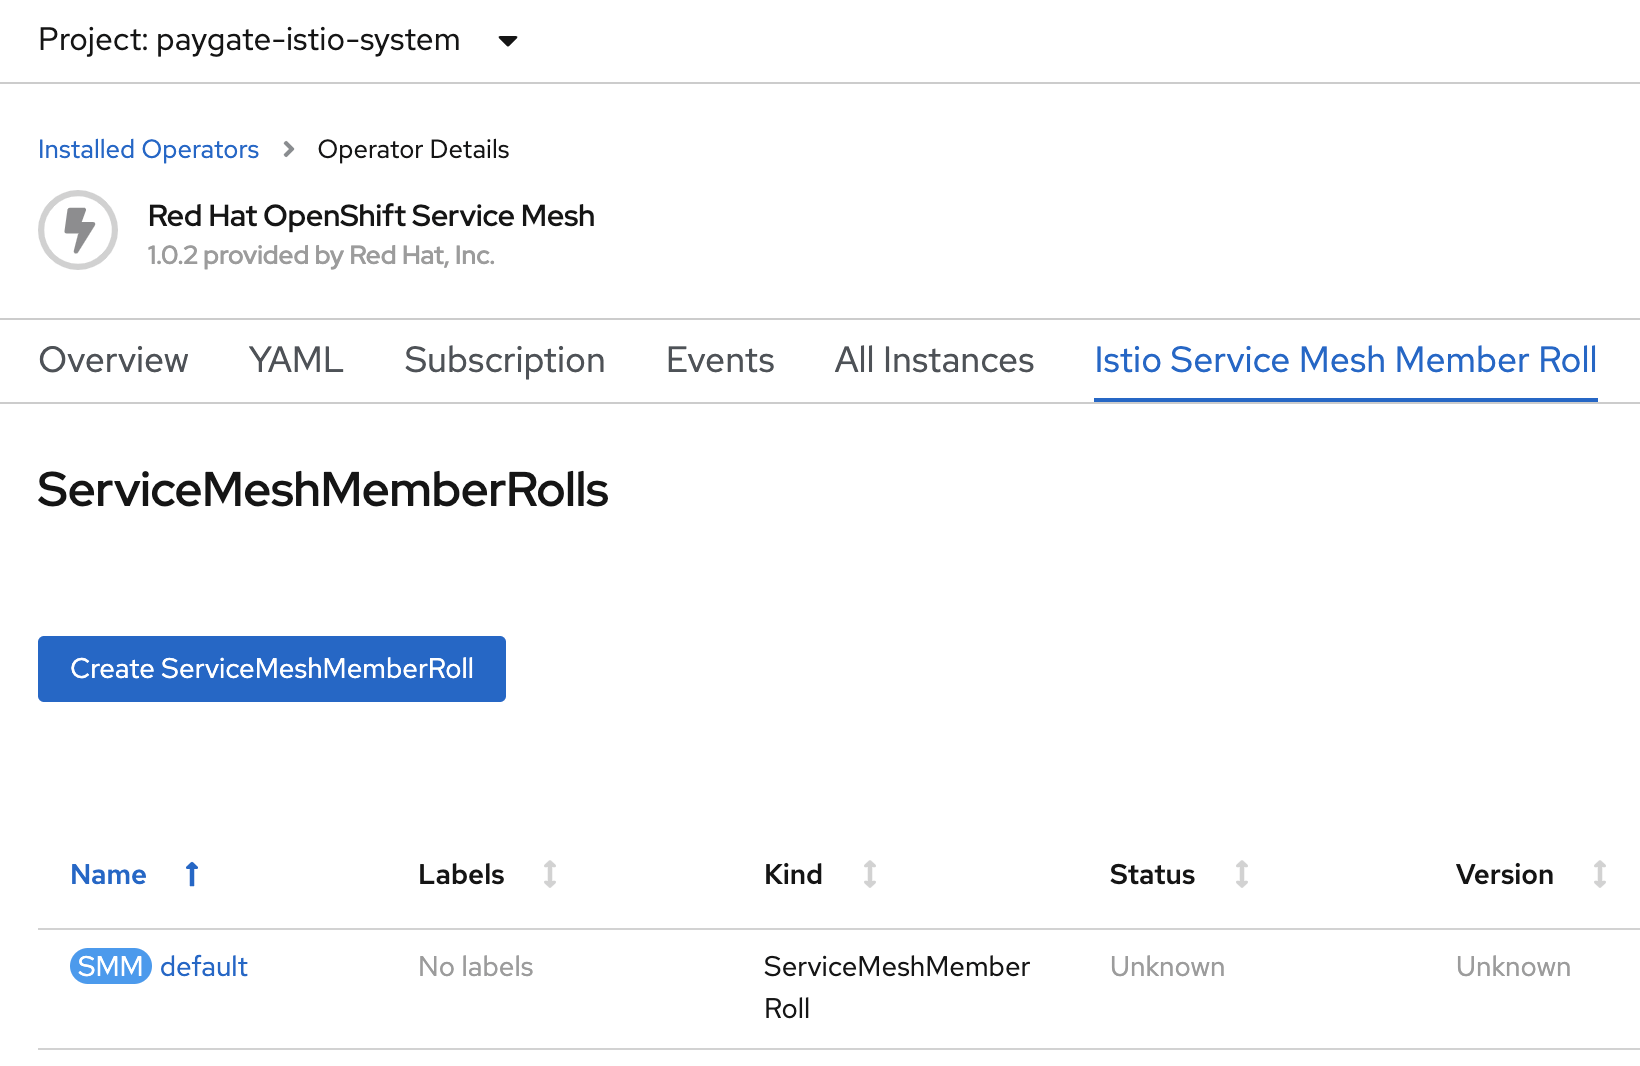
Adding Member Project
The are few major differences between community Istio comparing to Red Hat ServiceMesh. One of the differences is that ServiceMesh does not auto inject sidecar to the PODs when the project is added as ServiceMesh member. Instead you need to explicitly annotate the Deployment to include sidecar.istio.io/inject: “true” at .spec.template.metadata.annotations. This has been covered in the earlier Yaml files changes.
The above implicit sidecar injection annotation allows us to decide which PODs should be a member of ServiceMesh, which added much flexibility and control for ServiceMesh deployment.
The following shows the yaml content for adding the ServiceMesh Member Roll. In this example, the member is paygate OpenShift Project.
apiVersion: maistra.io/v1
kind: ServiceMeshMemberRoll
metadata:
  name: default
  namespace: istio-system
spec:
  members:
    - paygate
Run the following command to add the Member Roll.
oc create -n $ISTIO_SYSTEM_NAMESPACE -f ../tmp/istio/servicemeshmemberroll.yamlYou may also use the OpenShift admin console to add the member
Create Route for customer-ui Service
Once Istio is installed and PODs are injected with sidecar. The existing OpenShift route will not be accessible. You can delete the existing customer-ui OpenShift route and use the following yaml content to create the route.
Note that if you have configure ior_enabled: true to enable Automatic Route Creation in the ServiceMesh control plane installation, you does need to manually create the route here, OpenShift will auto create the route for you whenever you create the Istio Gateway.
This route must be create in the Istio Control Plane Openshift project. In this example the control plane project is named as paygate-istio-system.
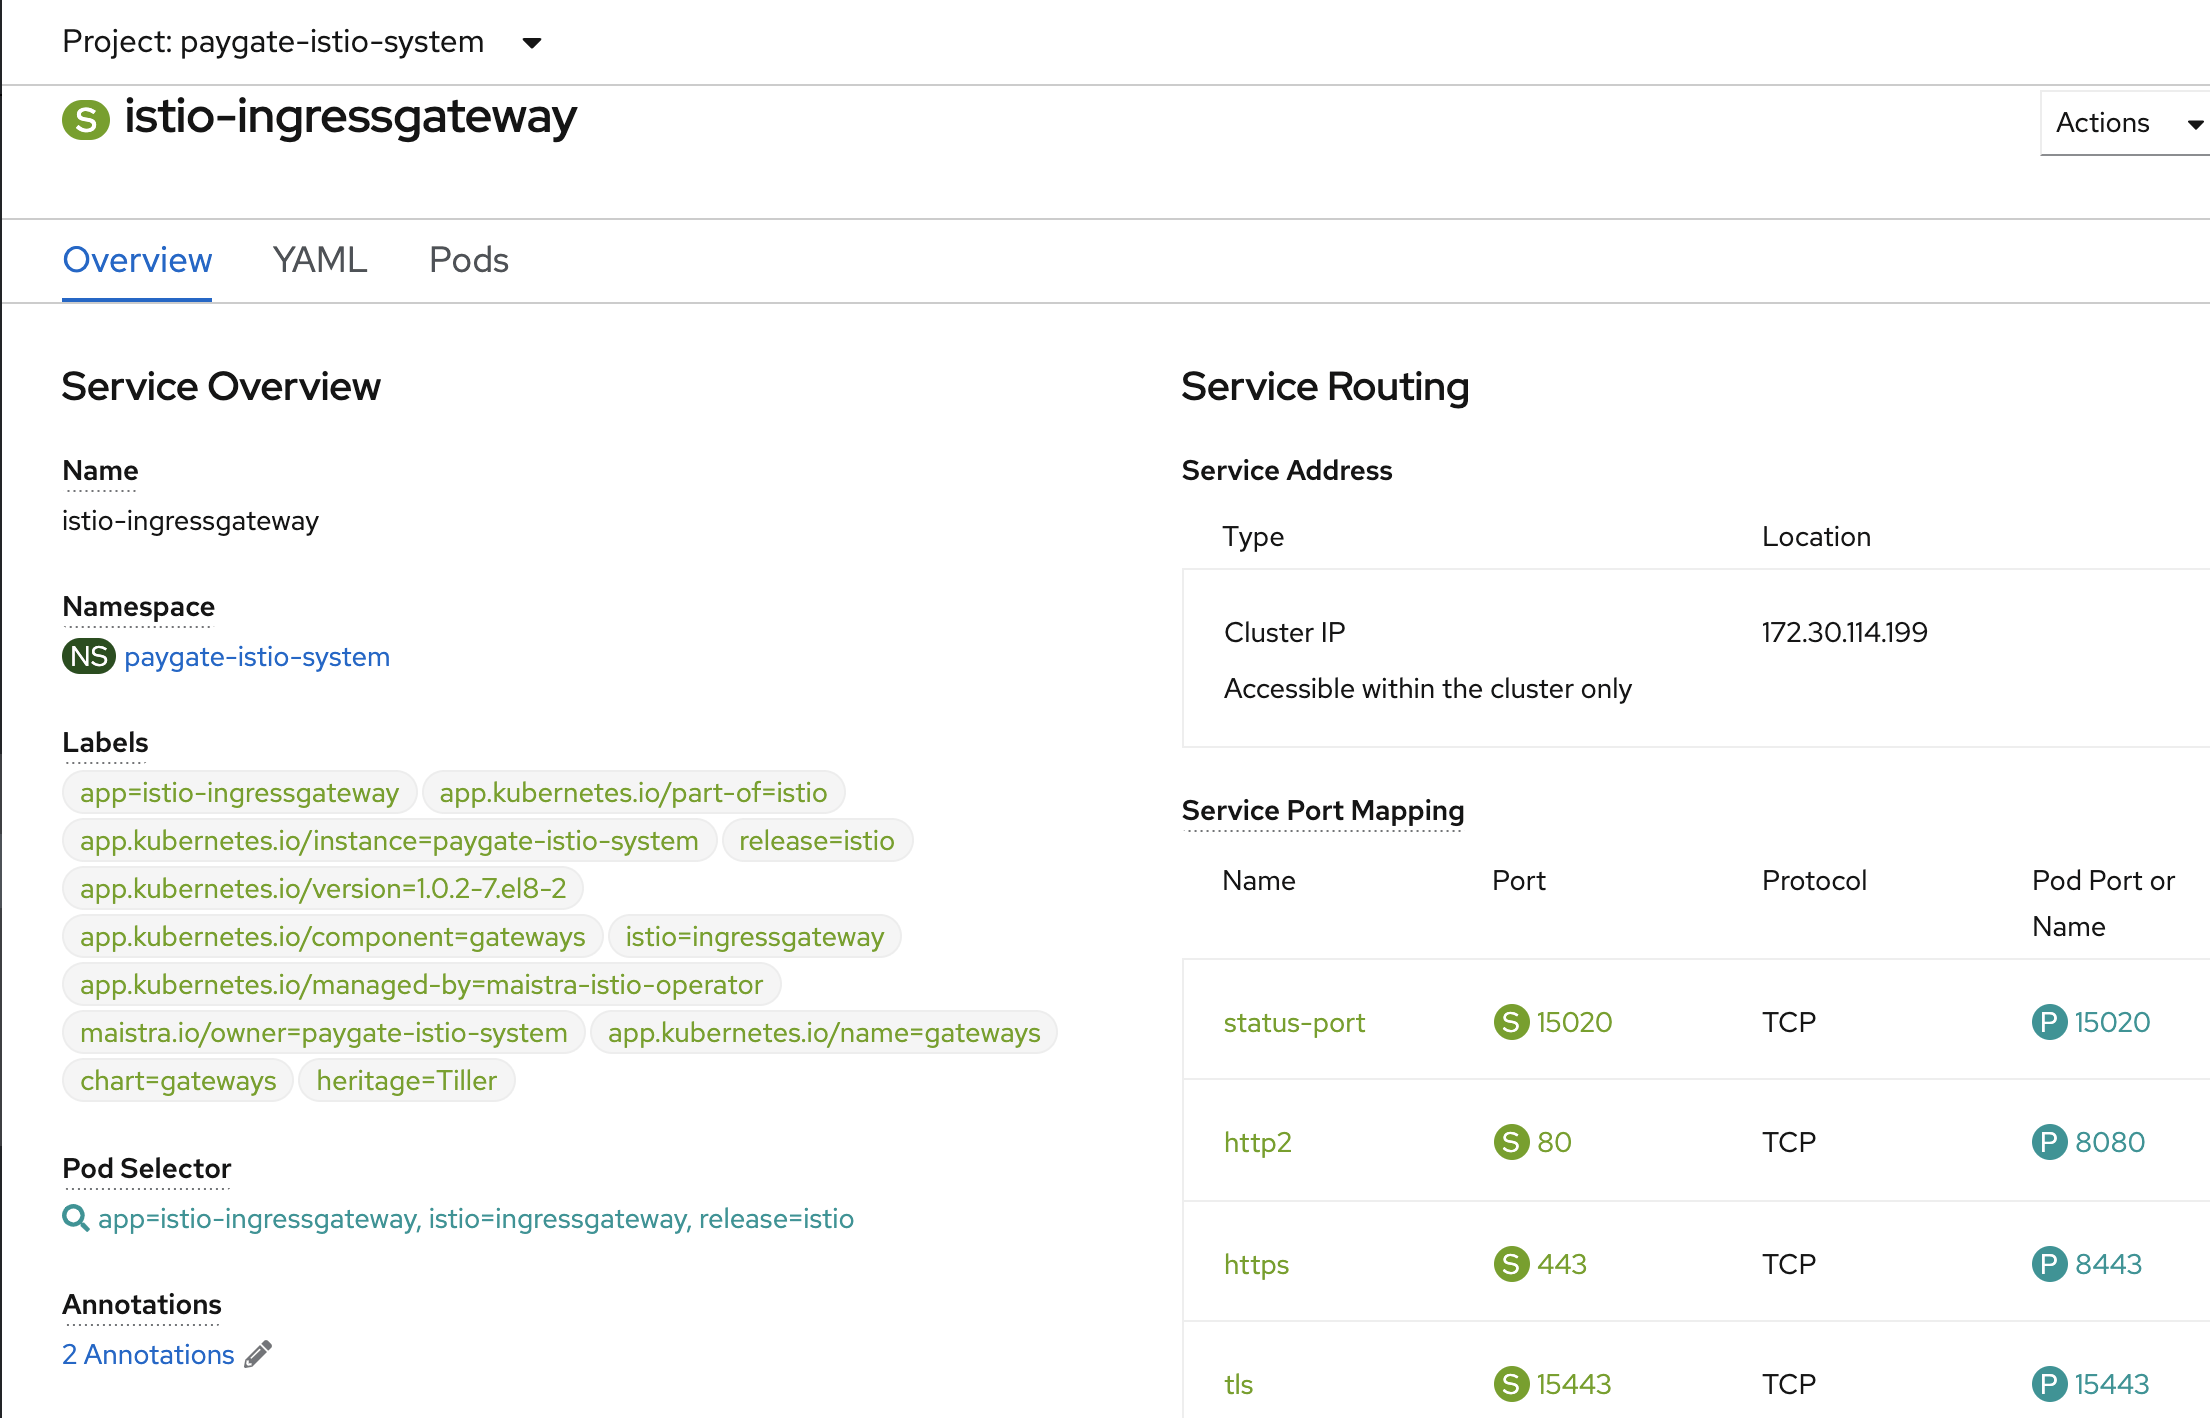
Note that we are using the default istio-ingressgateway.
apiVersion: route.openshift.io/v1
kind: Route
metadata:
  name: customer-ui
spec:
  # host name to be exposed as OpenShift Route for customer-ui
  host: customer-ui-paygate-istio-system.apps.cluster-spore-a724.spore-a724.sandbox596.opentlc.com
  port:
    targetPort: http2    # matching the port name for istio-ingressgateway
  to:
    kind: Service
    name: istio-ingressgateway
    weight: 100  # route all traffic to the this service
  wildcardPolicy: None
The following shows the istio-ingressgateway service. Notice the http2 is the non-secure port that we wish to use to route the traffic for customer-ui.
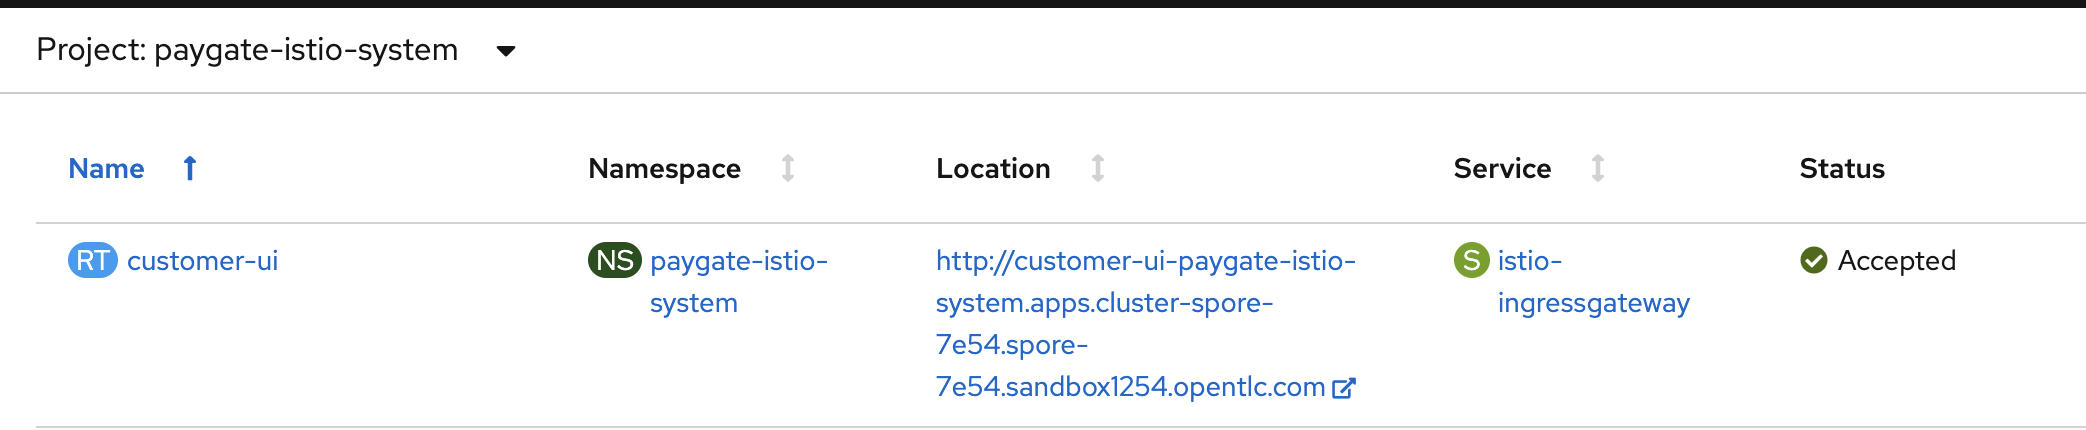
Run the following command to create the OpenShift route.
oc apply -f ../templates/istio/istio-apps-routes.yaml -n $ISTIO_SYSTEM_NAMESPACEThe following shows the created OpenShift route for customer-ui.
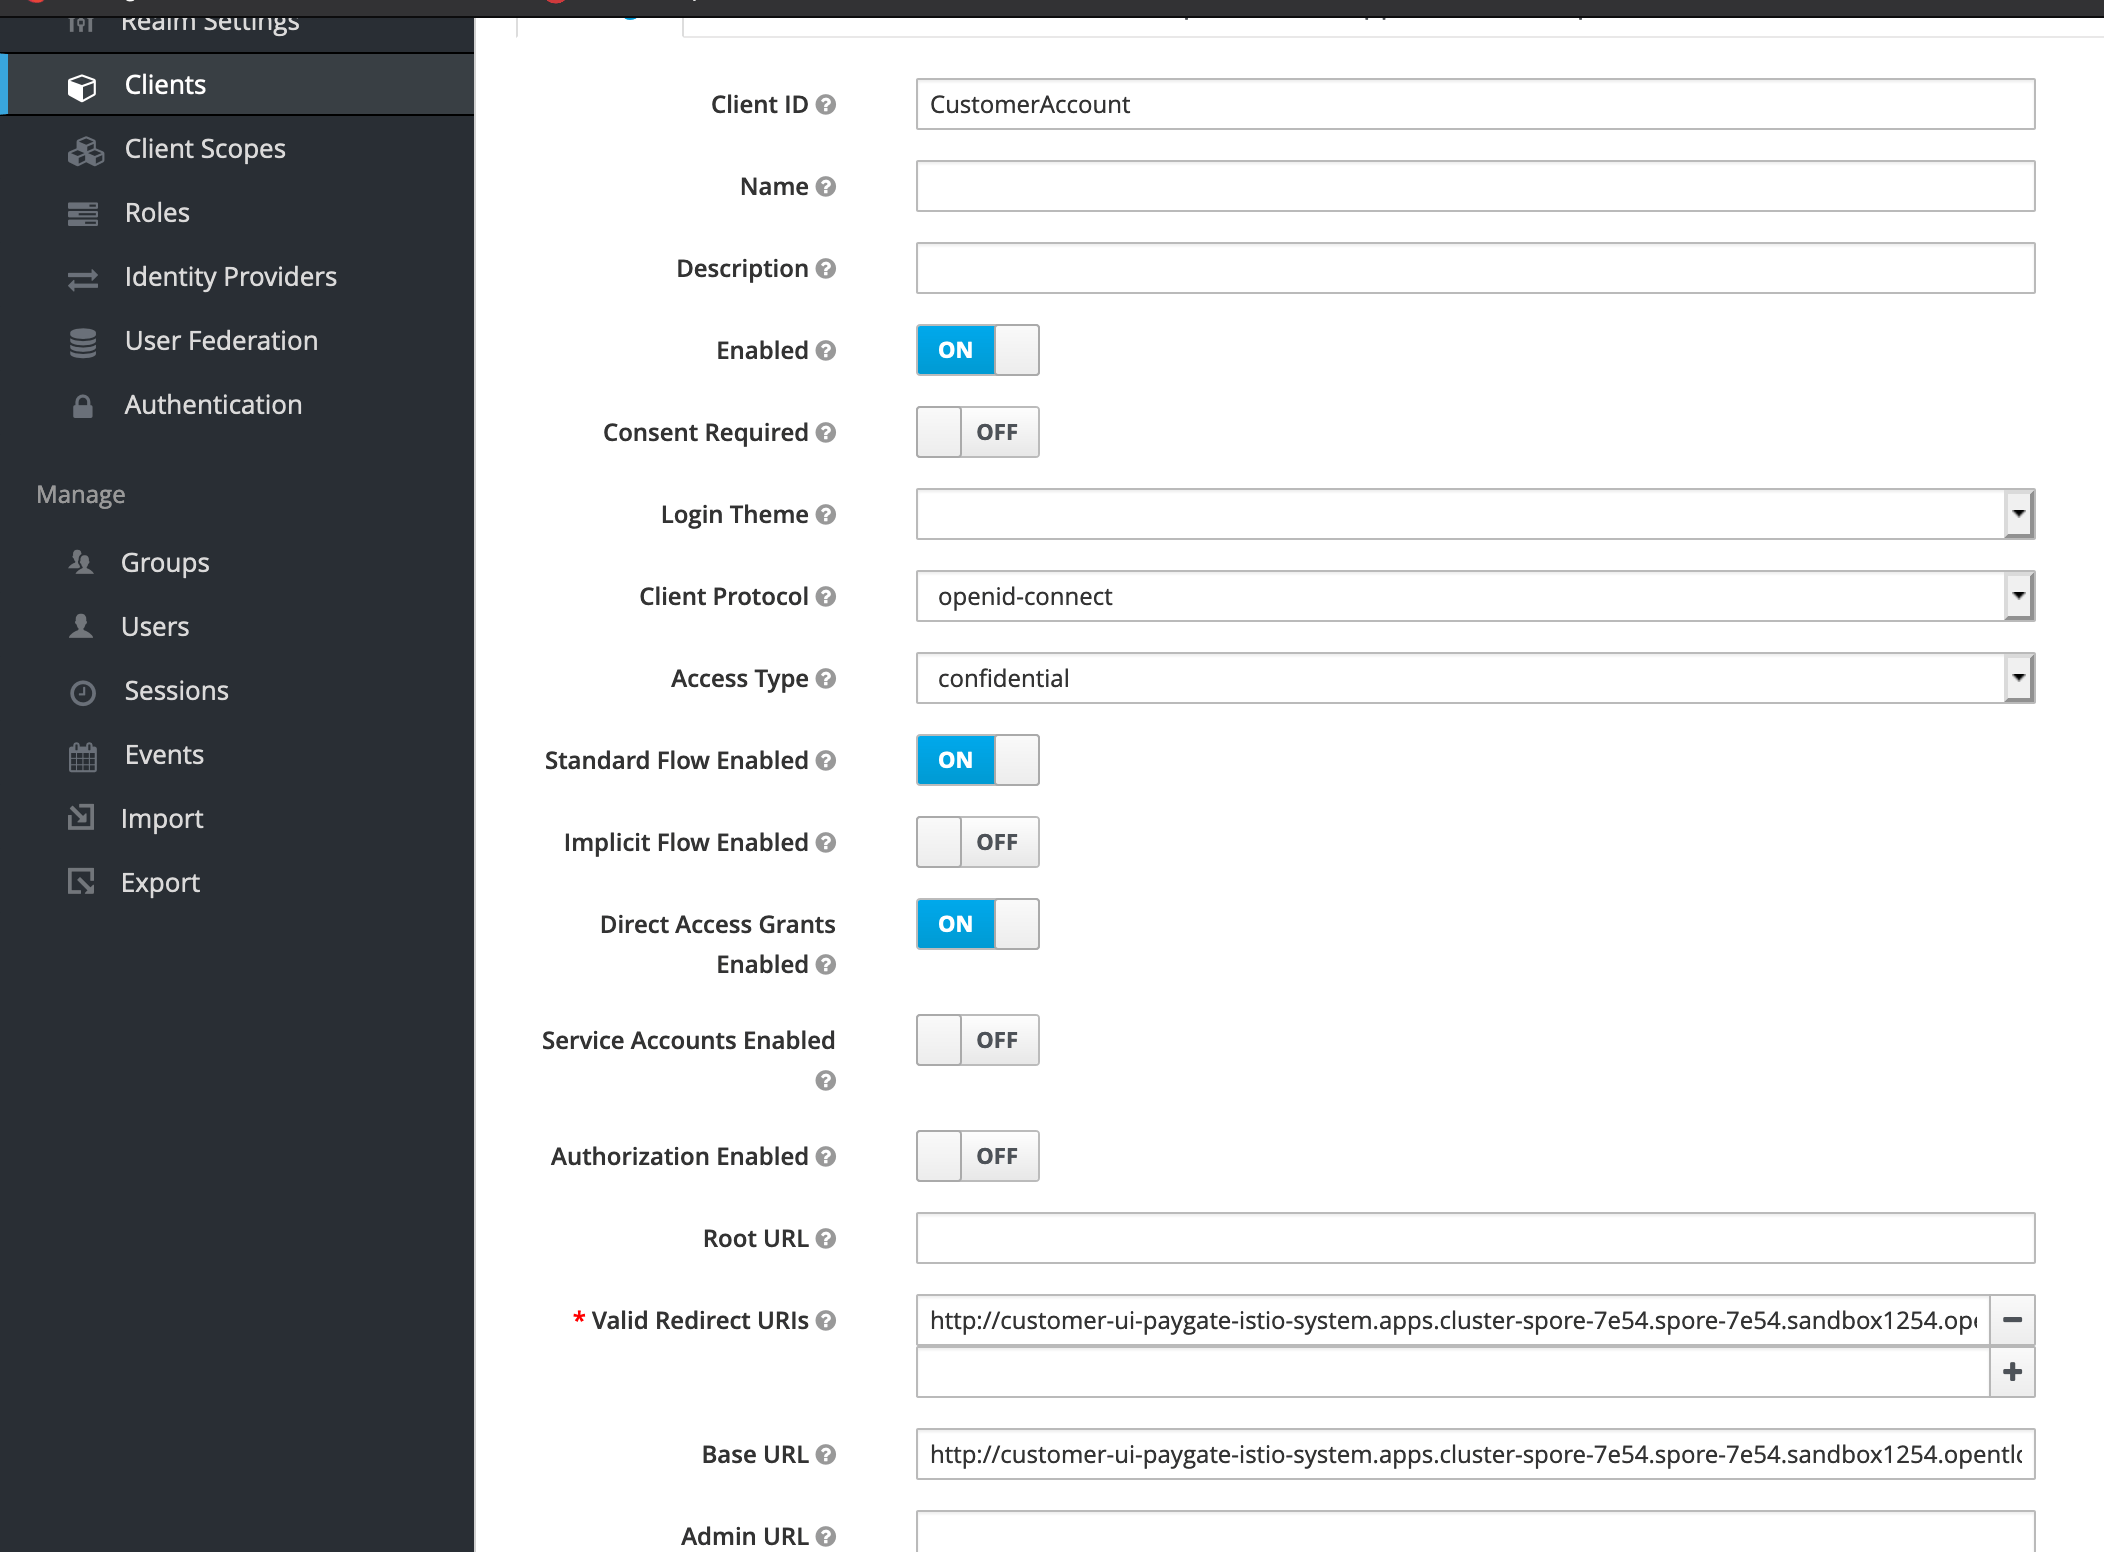
Change RHSSO Client for The New customer-ui Route
The customer-ui should be secured with Red Hat Single Sign-on (RHSSO), we will need to change the RHSSO client to point to the new route created in the previous section.
Create The Istio Gateway, Virtual Service and Destination Rules
Istio Gateway describes a load balancer operating at the edge of the mesh receiving incoming or outgoing HTTP/TCP connections. The specification describes a set of ports that should be exposed, the type of protocol to use, SNI configuration for the load balancer, etc.
Istio Virtual Service defines traffic routing with service as a unit of application behavior bound to a unique name in a service registry. Services consist of multiple network endpoints implemented by workload instances running on pods, containers etc.
Istio Destination defines policies that apply to traffic intended for a service after routing has occurred. These rules specify configuration for load balancing, connection pool size from the sidecar, and outlier detection settings to detect and evict unhealthy hosts from the load balancing pool.
Use the following yaml content to create the Gateway, Virtual Service and DestinationRule. Note that this is a simple example of routing policies and rules. You can create more complex rules and routing policies using Istio.
The following shows the Gateway configuration.
apiVersion: networking.istio.io/v1alpha3
kind: Gateway
metadata:
  name: customer-ui-gateway
spec:
  selector:
    # matching the istio-ingressgateway label "istio=ingressgateway"
    istio: ingressgateway
  servers:
  - port:
      number: 80   # The port for http2 in istio-ingressgateway service.
      name: http2
      protocol: HTTP
    hosts:
    # istio ingress host. This is the route defined in paygate-istio-system
    - "customer-ui-paygate-istio-system.apps.cluster-spore-a724.spore-a724.sandbox596.opentlc.com"
The following shows the Virtual Service configuration.
apiVersion: networking.istio.io/v1alpha3
kind: VirtualService
metadata:
  name: customer-ui
spec:
  hosts:
  # istio ingress host. This is the route defined in paygate-istio-system
  - "customer-ui-paygate-istio-system.apps.cluster-spore-a724.spore-a724.sandbox596.opentlc.com"
  gateways:
  - customer-ui-gateway    # matching the gateway name
  http:
    - route:
      - destination:
          host: customer-ui     # matching the customer-ui service name
          subset: v1      # matching the subsets in DestinationRule.
        weight: 100
The following shows the DestinationRule configuration. Note the version label value (v1) is matching the value we had set in the Deployment configuration. There are a lot more routing rules you can apply here, refer DestionationRule for more detail.
apiVersion: networking.istio.io/v1alpha3
kind: DestinationRule
metadata:
  name: customer-ui
spec:
  host: customer-ui
  subsets:
  - name: v1
    labels:
      version: v1   # matching the "version" label set in Deployment.
You can put these configuration into one single yaml file and run the following command to create them. These have to be created in the application OpenShift project, in this example is paygate.
oc apply -f ../templates/istio/customer-ui-istio-network-config.yaml -n $APPS_NAMESPACEBypass Istio Policies for Non-ServiceMesh Applications
If you have some services inside the ServiceMesh member project that need to be accessed outside of ServiceMesh which they are considered as non-ServiceMesh components. We will not create the ServiceMesh specific routes for this case. You will need to modify the OpenShift Network Policy to bypass those services.
Perform the following to update the network policy in the application OpenShift project.
oc patch networkpolicy istio-mesh -p '{"spec":{ "podSelector": {"matchLabels": { "pgw-istio": "true"}}}}' -n $APPS_NAMESPACERemember in the earlier section, the Deployment in the yaml file with additional label of pgw-istio under .spec.template.metadata.labels. With the above network policy change, we indicates we would like the network policy to be applied on those PODS with pgw-istio set to true.
If you follow the article How Can I Monitor Container Applications Resources on OpenShift, I have Grafana and Prometheus deployed inside the application OpenShift project. This network policy change will allow user to access to Grafana and Prometheus using the typical OpenShift routes in the application OpenShift project.
You can also use the OpenShift admin console to make the changes.

Accessing The ServiceMesh
Perform a few credit transfer transactions using the customer-ui to create some traffics. Go to Kiali to view the metrics captured by ServiceMesh.
Note: Refer GitHub for how to access the customer-ui.
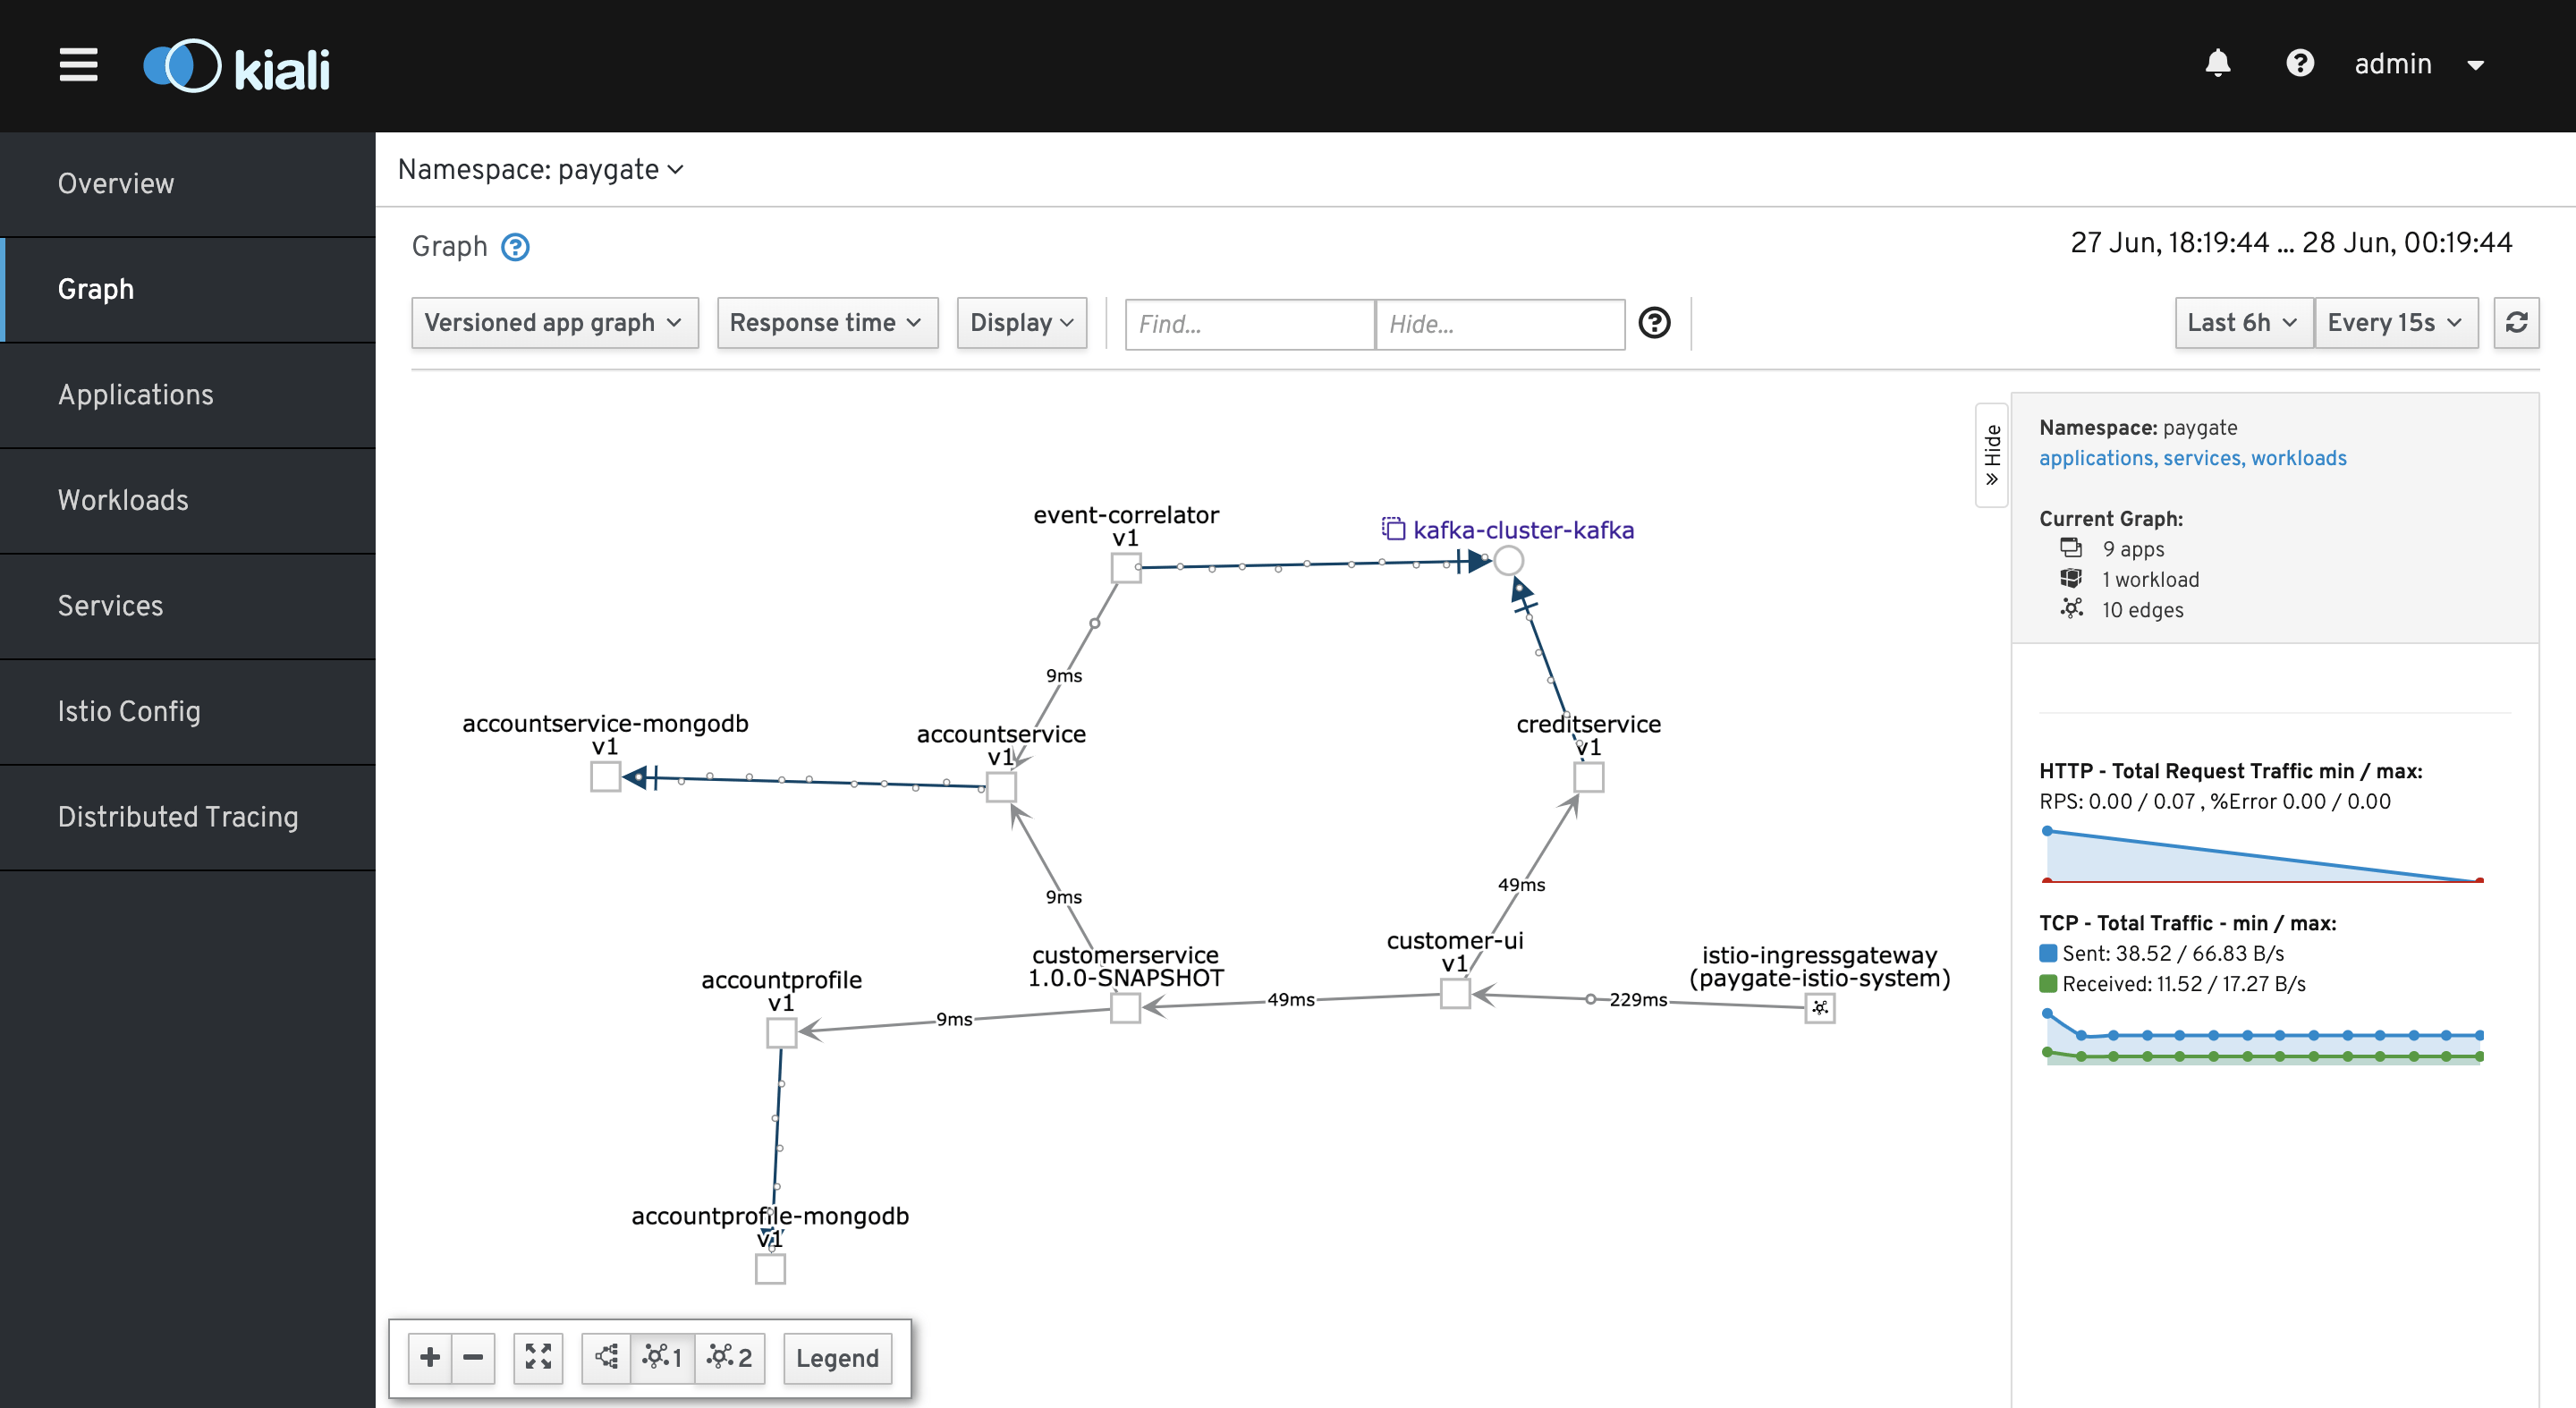
The following shows the applications under ServiceMesh. Note that Kiali indicates alertmanager is missing sidecar, this is intentional because we did not annotate the alertmanager to inject sidecar. This is non-ServiceMesh component. Same applies to Prometheus and Grafana.
It is also crucial to enable liveness probe for all the PODs so that ServiceMesh is able to validate the PODs health as shown on the screen.

The following shows the services in ServiceMesh. Note the Ports section is indicated with green tick icon. If the naming convention is not correct for the POD service, it will shows a red icon to indicate an error.

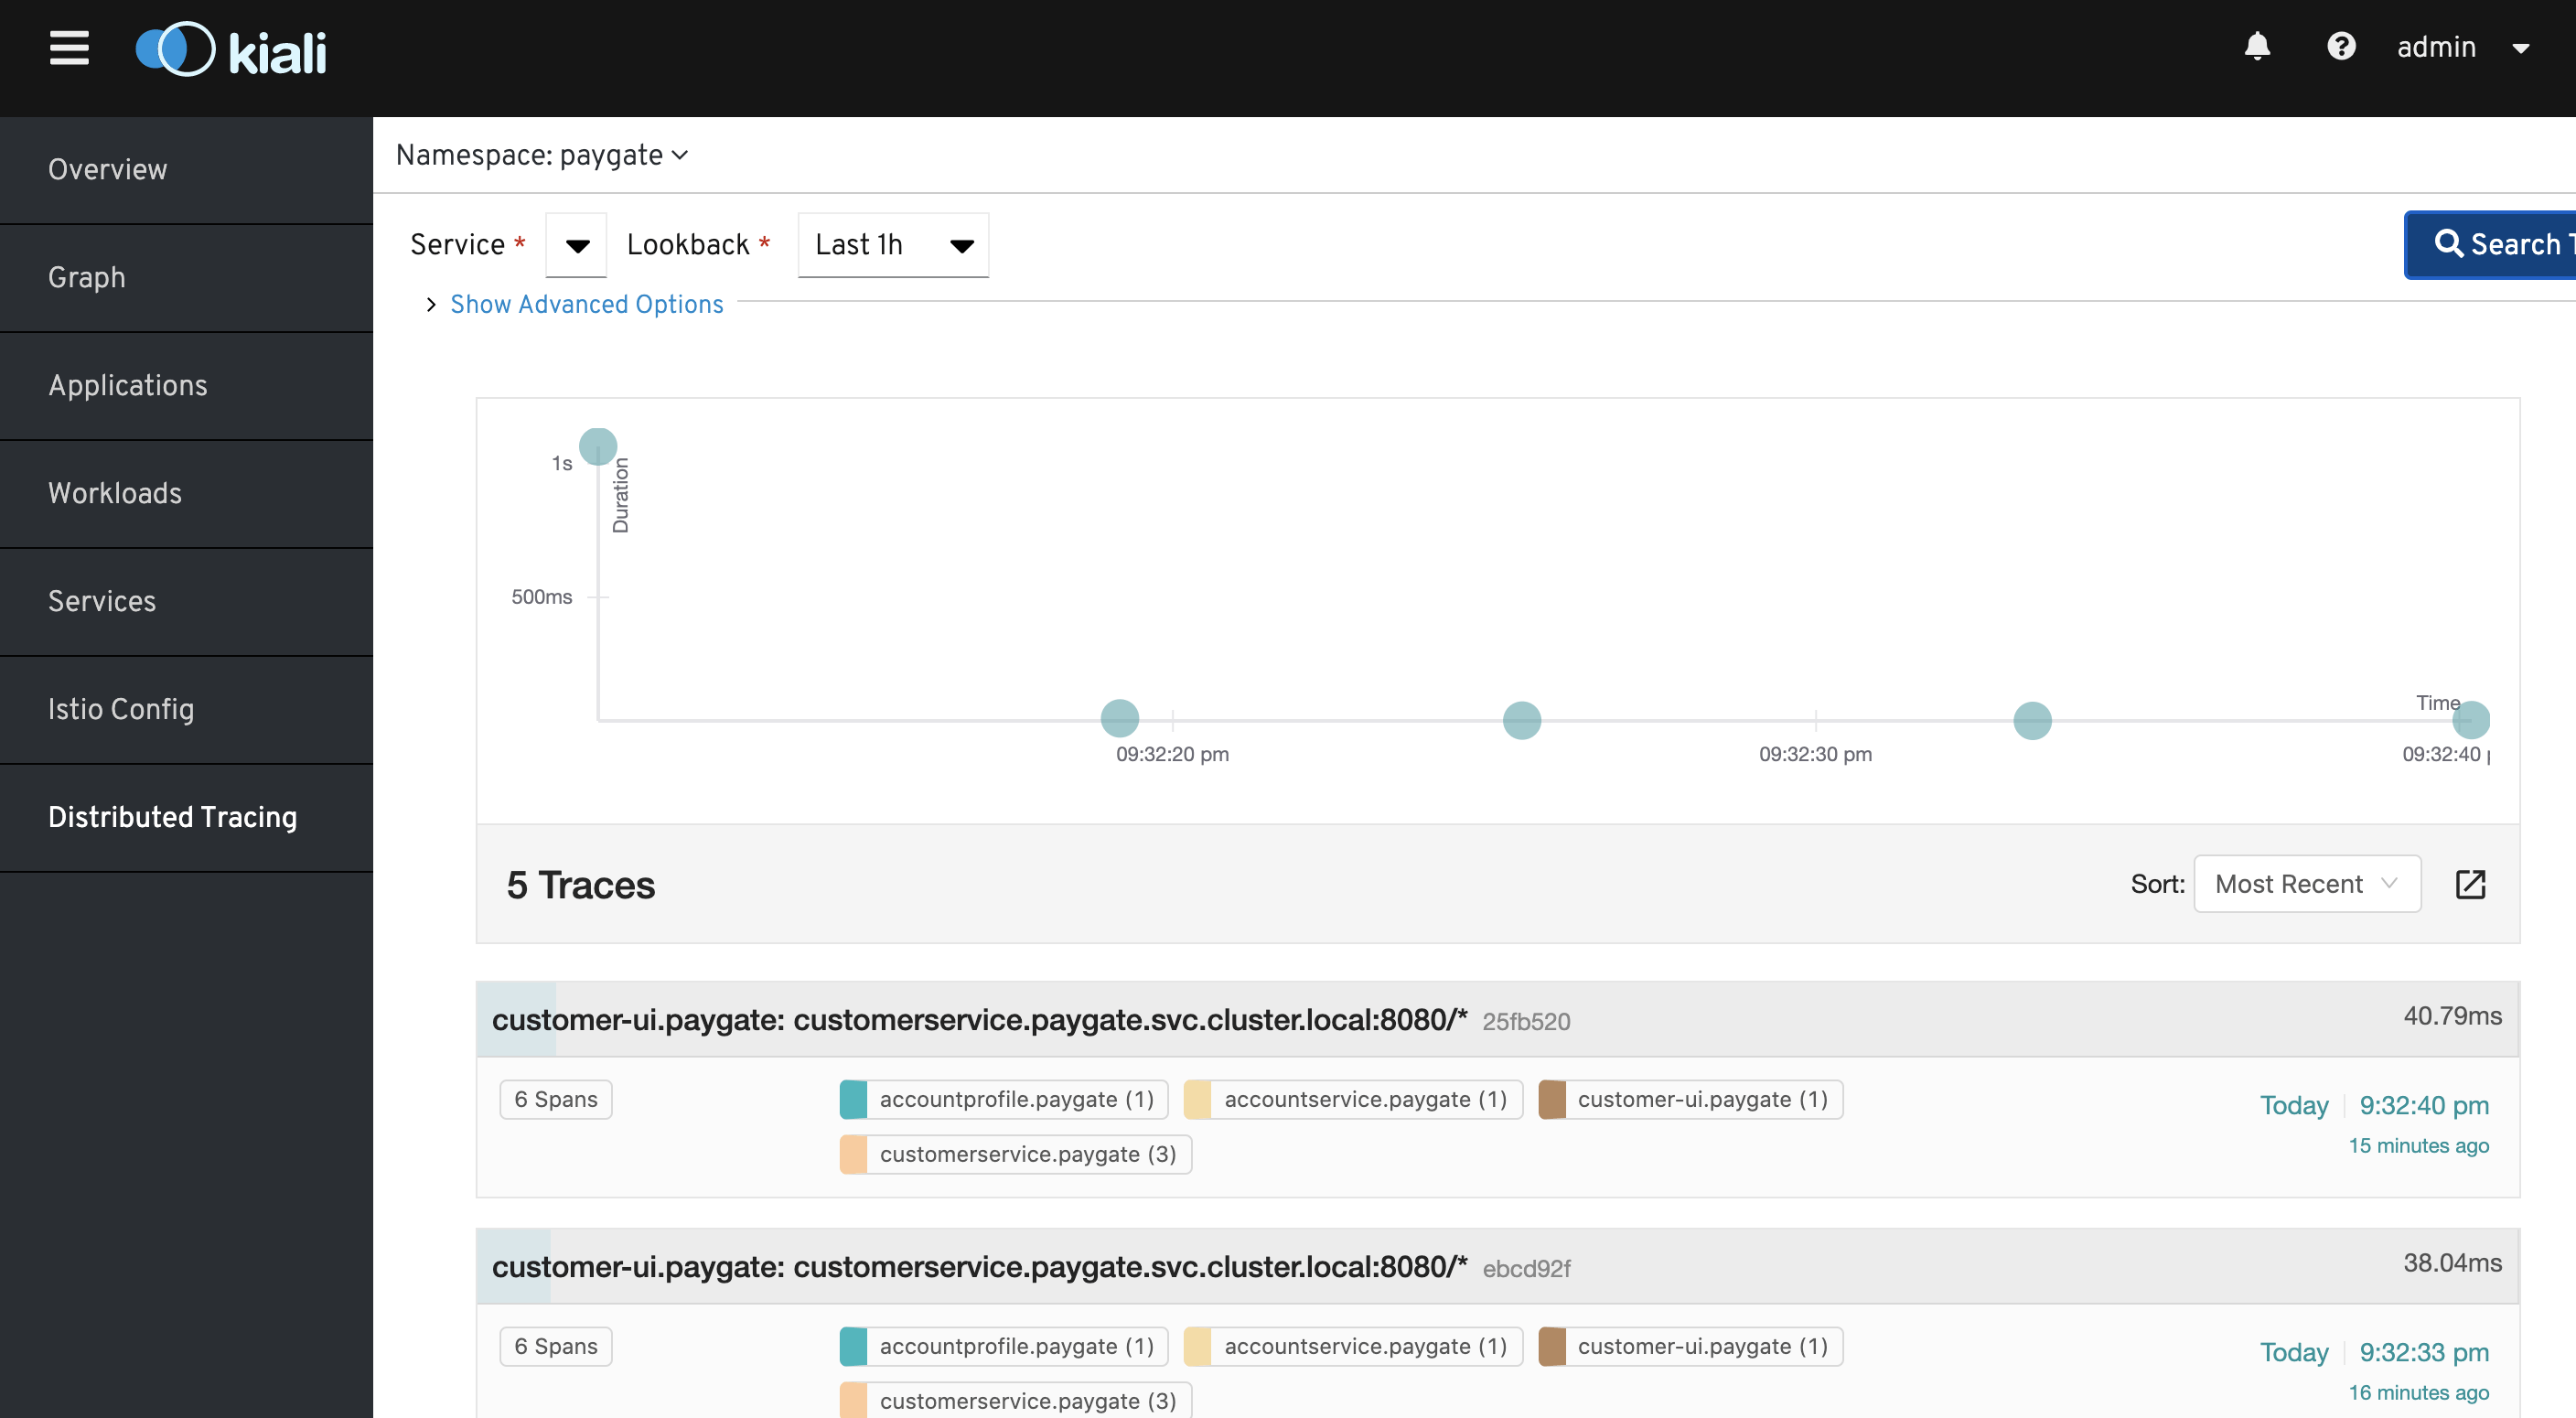
The Red Hat ServiceMesh installation also pre-integrated the Jaeger UI on Kiali which you can see from the following screen.
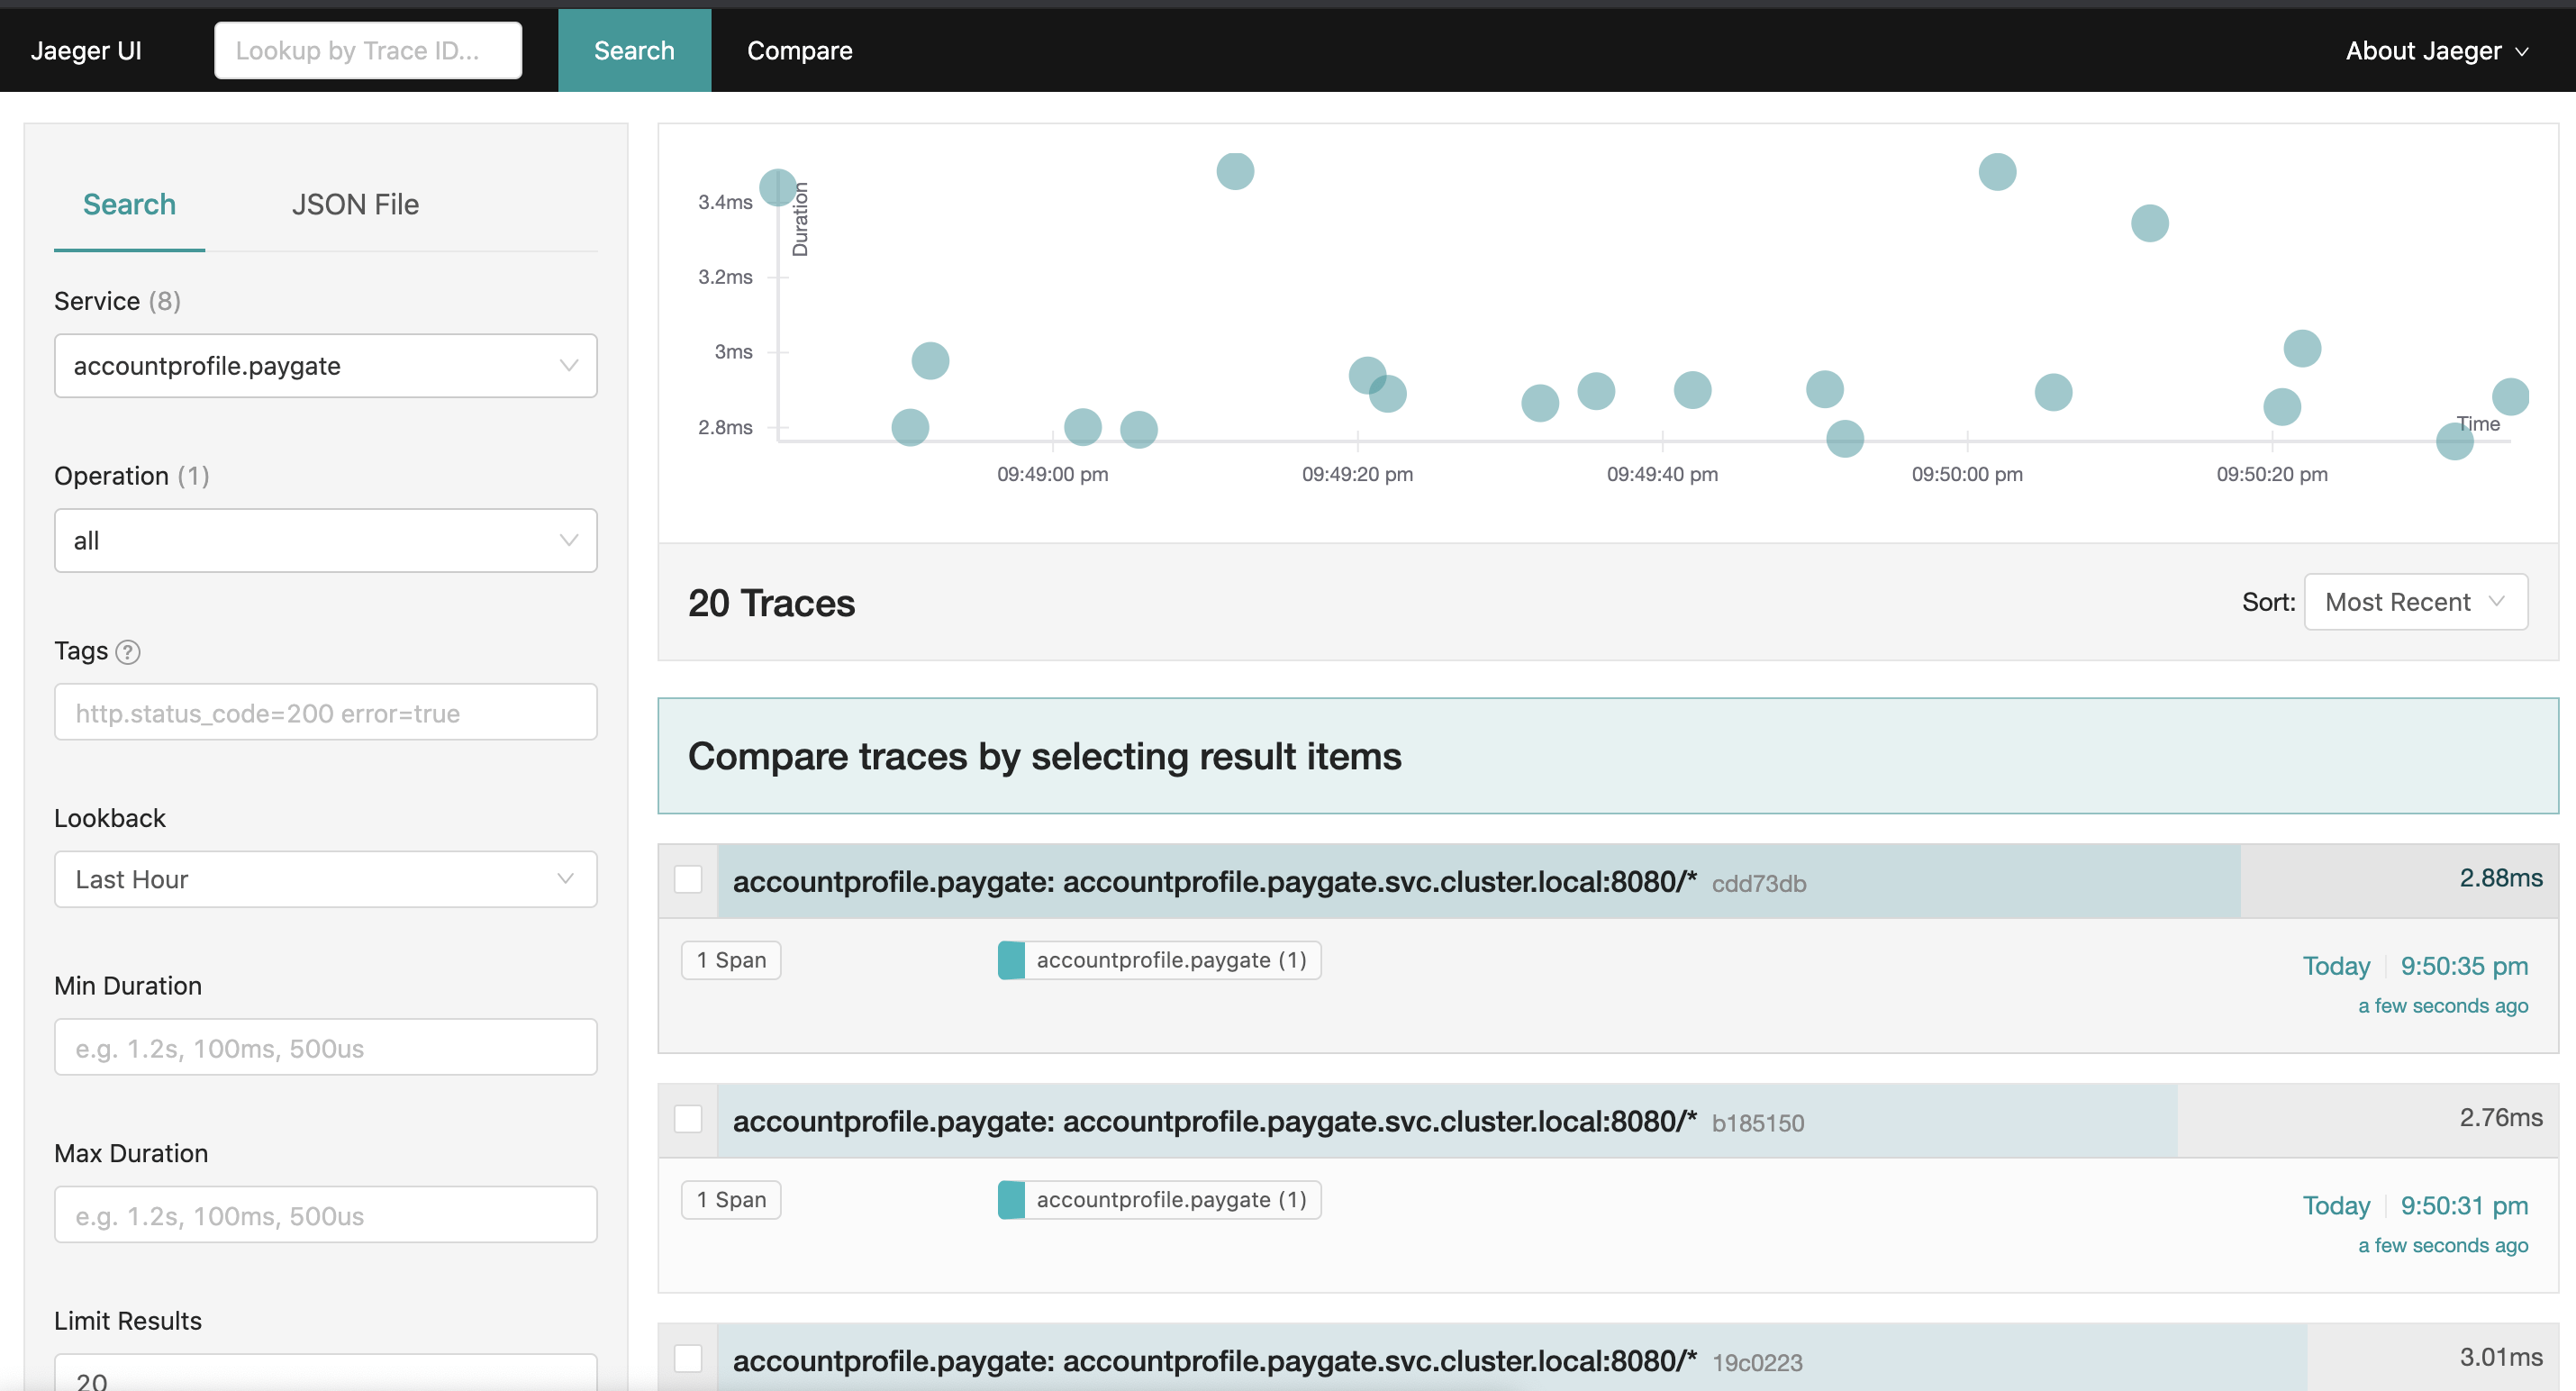
You can also access to Jaeger on it’s own console.
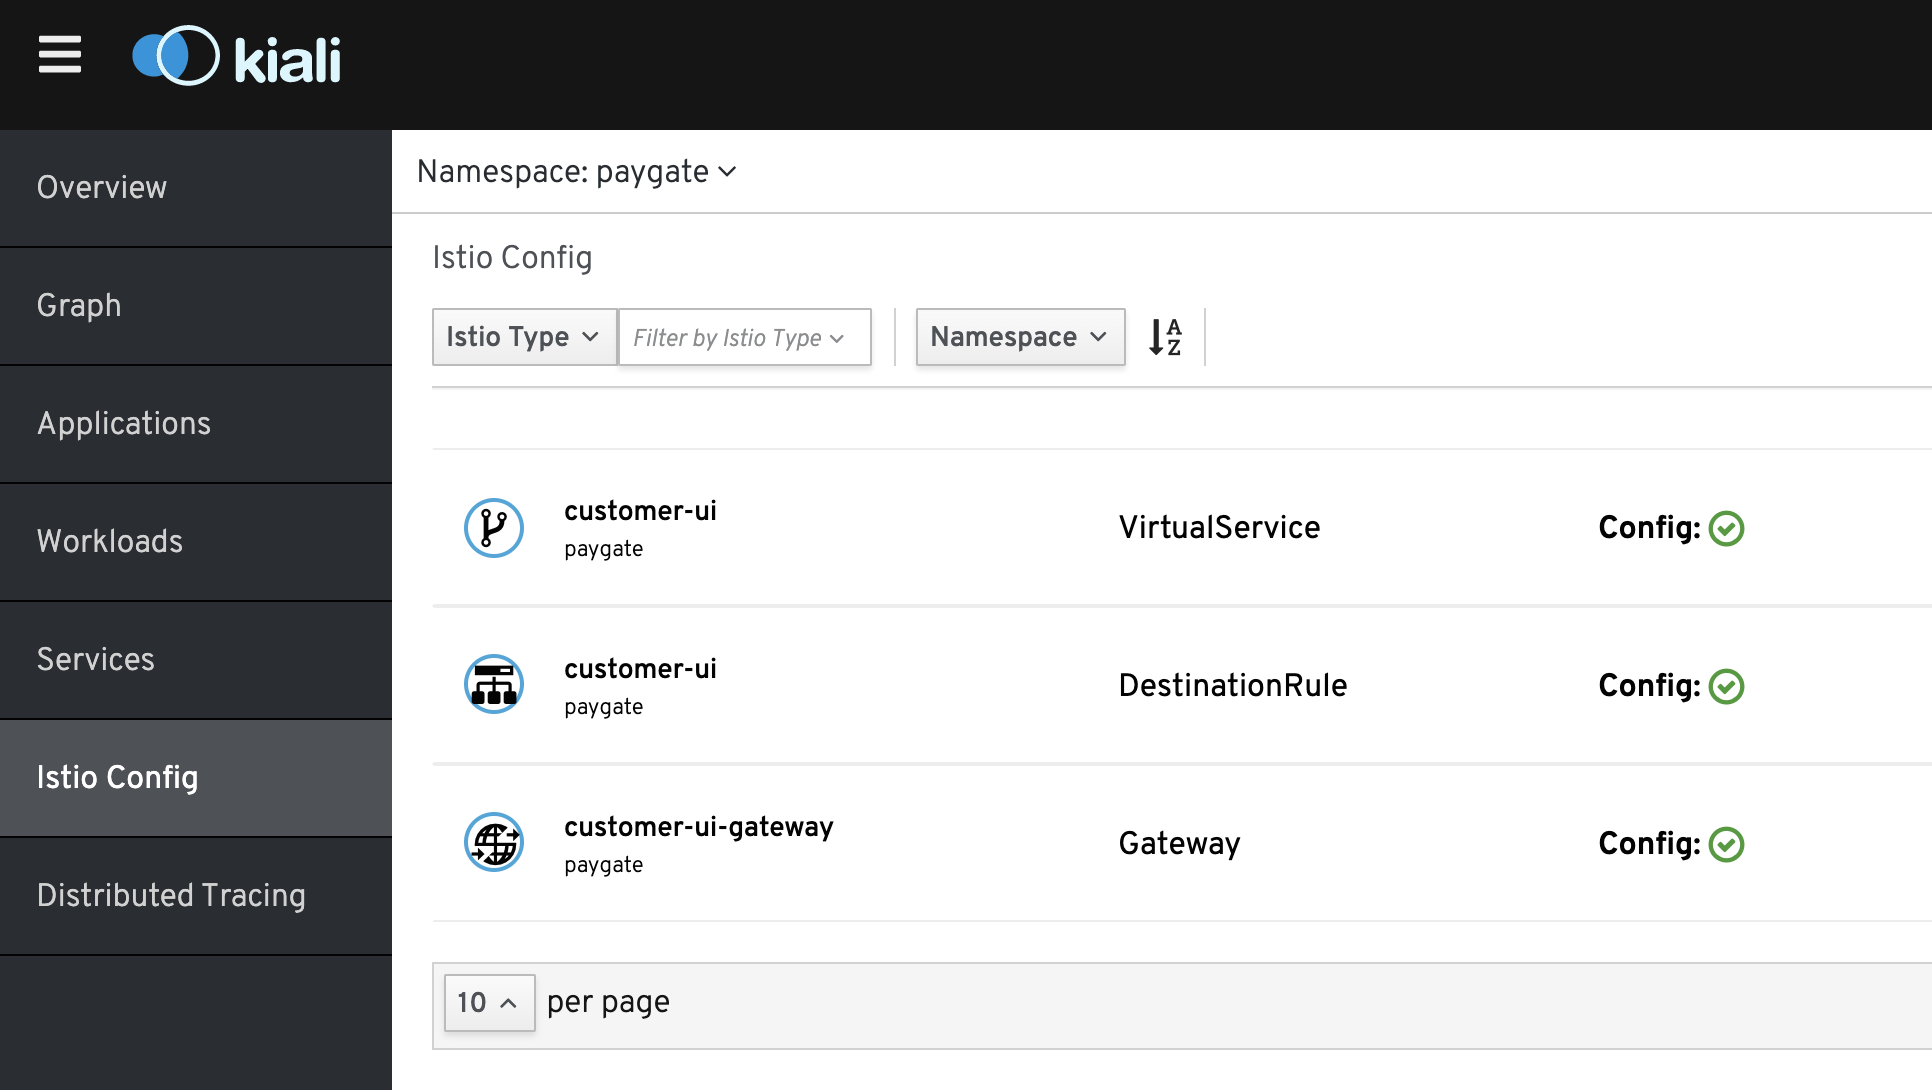
The following shows the customer-ui Gateway, Virtual Service and DestinationRule.
Summary
Running ServiceMesh or Istio on OpenShift is pretty easy as long as you understand the differences between upstream community Istio and Red Hat ServiceMesh. With the enhancements tweak for OpenShift it makes managing and running microservice applications on Istio peanut easy both for administrators and developers.
References
- Implementing CI/CD for .NET Core Container Applications on Red Hat OpenShift
- Implementing Integration Service with Apache Camel
- How to Create A MongoDB Kafka Connect Container Image for OpenShift?
- How Can I Monitor Container Application Resources on OpenShift?
- Maistra Service Mesh – Red Hat Service Mesh upstream project
- Guide to Install the Working Demo of Payment Gateway