
Table of Contents
- Overview
- What is PXE boot?
- Configure PXE Boot
- Install Ubuntu Server on Raspberry Pi
- Test The PXE Boot Raspberry Pi
- Bumps to Watch Out
- Summary
- References
Overview
Running Raspberry Pi 4 with SD card (a good fast SD card) is fine, if speed and resiliency is not a concern. SD cards always have speed limitation and there are chances SD card maybe corrupted during incidents such as power interruption. I am going to use this to host my websites and data. For this, I need a better solution with proper storage backup for the OS, binaries and data. The best is the solution can provide reusable golden base OS image to deploy multiple Kubernetes nodes. This is where I am looking at PXE boot Raspberry Pi 4 from my Synology storage server.
I am using Ubuntu OS for my Raspberry Pi here. You can refer to the Part 1 for the reason of why I choose Ubuntu.
Note: You can also boot your RPi 4 from USB drive which provides better performance on disk IO. You can find out how to do this from this great post – I’m booting my Raspberry Pi 4 from a USB SSD by Jeff Curling.
What is PXE boot?
The person that can explain this better is no other than Wikipedia. The Preboot eXecution Environment, PXE (most often pronounced as /ˈpɪksiː/ pixie, often called PXE Boot/pixie boot.) specification describes a standardized client–server environment that boots a software assembly, retrieved from a network, on PXE-enabled clients.
On the client side it requires only a PXE-capable network interface controller (NIC), and uses a small set of industry-standard network protocols such as DHCP and TFTP.
In short, you can boot your Raspberry Pi OS remotely over network from a central server that is configured to support PXE booting.
Configure PXE Boot
You need to install Raspberry Pi OS and configure the PXE boot using the OS. You can then proceed to re-install the Ubuntu OS on your RPi 4. I have not found a simple way to configure PXE boot on Ubuntu OS directly at the moment. Please let me know if you aware of how to do this.
I will not be covering the Raspberry Pi OS installation here. This can be easily done with Raspberry Pi Imager.
Configure PXE Boot Raspberry Pi 4
Once you have the Raspberry Pi OS install on the SD Card, proceed to boot it and ssh into the OS. Do the following command to update the OS and install the rpi-eeprom.
sudo apt-get update -y && sudo apt-get full-upgrade -y && sudo apt install -y rpi-eepromRun the following command to get the latest installed EEPROM and make a copy in your local directory inside the RPi 4.
LATEST_PIEEPROM=$(ls -1 -r /lib/firmware/raspberrypi/bootloader/stable/pieeprom*  | head -n1)

cp $LATEST_PIEEPROM pieeprom.bin
Create a EEPROM configuration with the following command. In here it is named as bootconf.txt. The only configuration that you need to change is the TFTP_IP. This is your server where the RPi 4 will be booting from. We will cover this TFTP server configuration setup in the next section.
cat <<EOF | tee bootconf.txt
[all]
BOOT_UART=0
WAKE_ON_GPIO=1
POWER_OFF_ON_HALT=0
DHCP_TIMEOUT=45000
DHCP_REQ_TIMEOUT=4000
DHCP_FILE_TIMEOUT=30000
TFTP_IP=<tftp server ip>
TFTP_PREFIX=0
BOOT_ORDER=0x21
SD_BOOT_MAX_RETRIES=3
NET_BOOT_MAX_RETRIES=5
[none]
FREEZE_VERSION=0
EOF
Next you will need to run the command to update this new configuration and write them into the RPi 4 EEPROM. This will complete the PXE Boot configuration at the RPi 4.
rpi-eeprom-config --out pieeprom-new.bin --config bootconf.txt pieeprom.bin

sudo rpi-eeprom-update -d -f ./pieeprom-new.bin
You will need to reboot the OS to allow the changes to be effective. There are one more thing we need to do before we proceed to reboot the OS.
Let’s execute the following command to find out the RPi serial number. Take down this serial number. We will need to use it for our PXE boot folder at the TFTP server site.
vcgencmd otp_dump | grep 28: | sed s/.*://gYou can now try to reboot the RPi 4 with the SD card unplugged. Connect a monitor to the RPi 4 while you are doing this. If you see messages that RPi 4 is trying to network boot from the configured TFTP IP address, means the configuration is working. The boot will fail at this stage because we have not completed the server site configurations.
Configure the TFTP Server
In here, I am using my existing Synology storage server for the NFS share required for the PXE boot and the necessary TFTP server configuration.
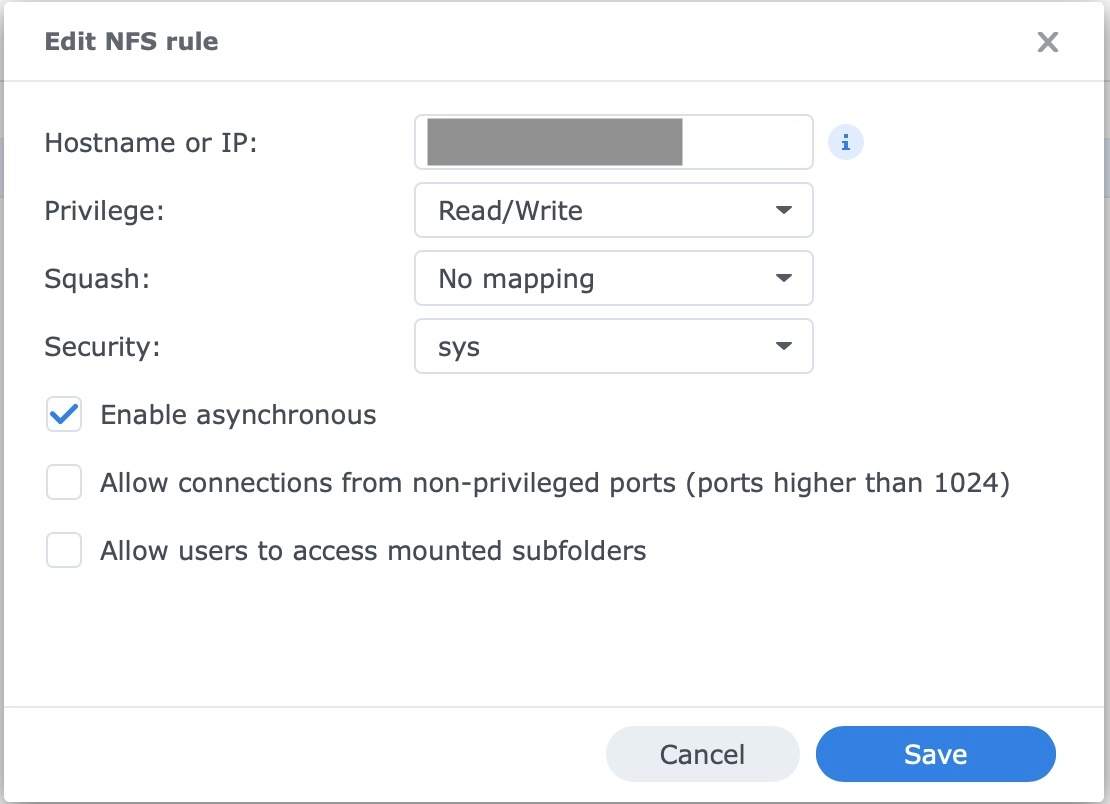
The first thing we need to do is to create 2 NFS share folders. I named them as rpi-pxe and rpi-tftpboot. rpi-tftpboot will store all the RPi boot loader files and rpi-pxe will store all the RPi OS files.
You can refer the following for the configurations that I had done. You can just apply the same configurations and permissions for both the share folders or tweak them to your preferences.
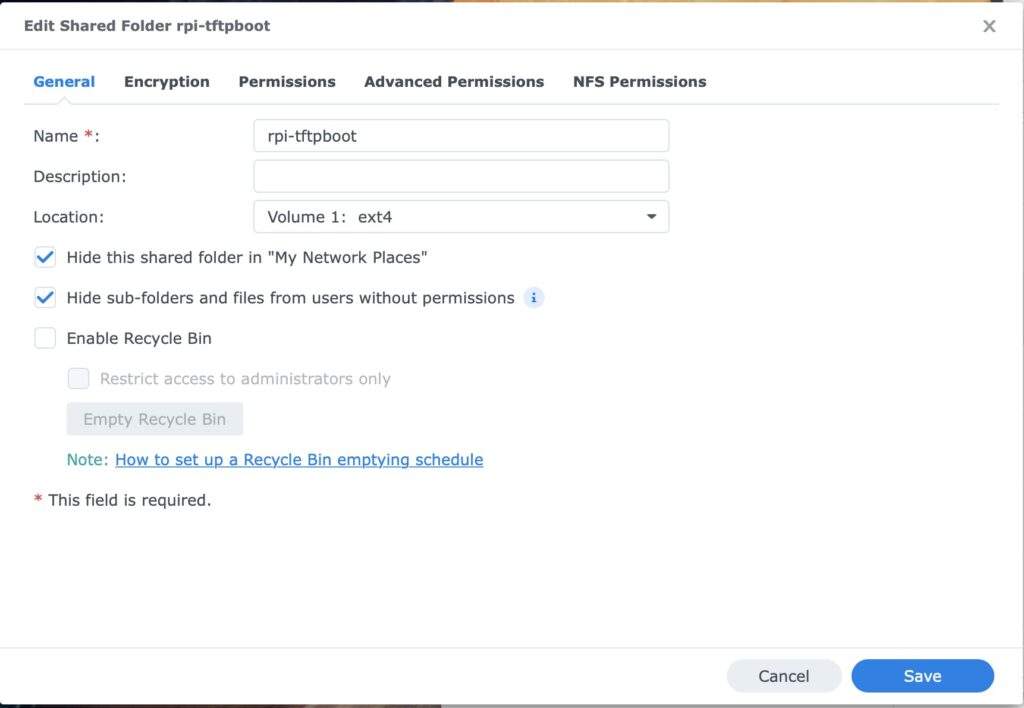

NFS shared folder 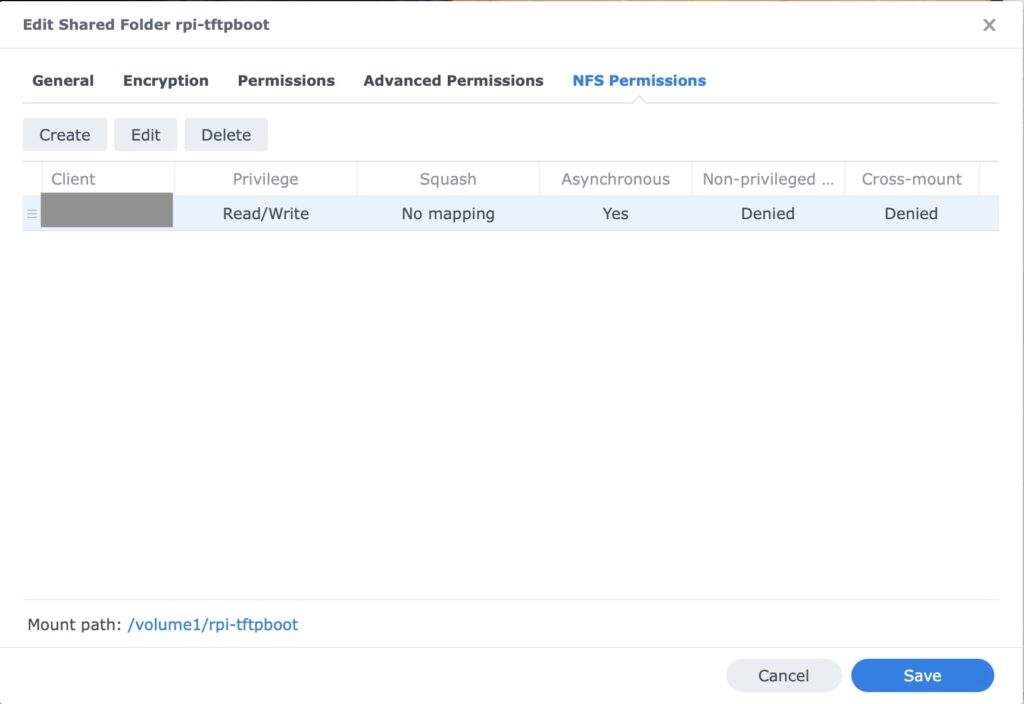

NFS Settings 

NFS Permissions

Note: TFTP stands for Trivial File Transfer Protocol. Please refers wikipedia for more explanation.
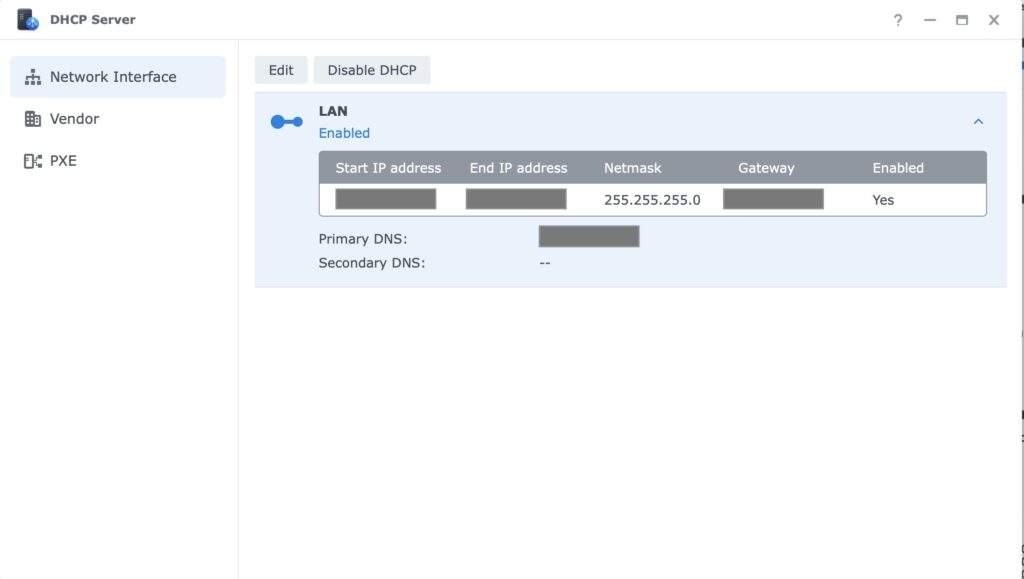
Synology storage server includes the DHCP server which also includes the TFTP server that you can configure easily for this PXE boot purpose. The following are the configurations that I have done.

DHCP configuration 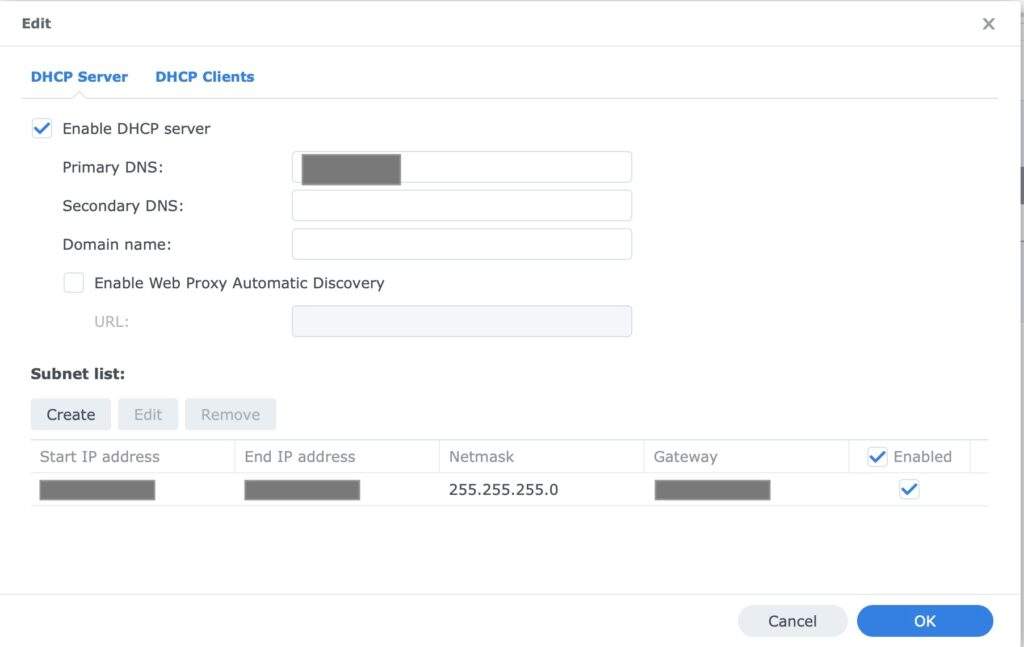

DHCP Details 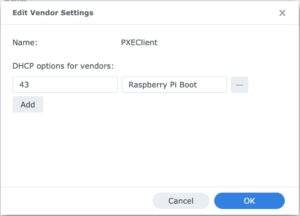

DHCP Settings for RPi 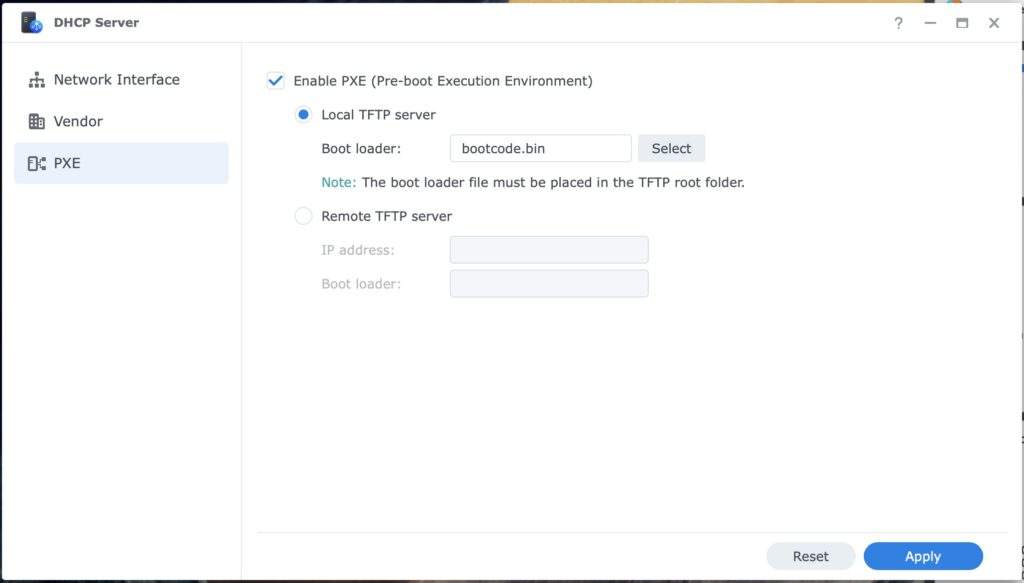

TFTP Configurations
In order to enable TFTP server on Synology, you need to first enable the DHCP server. By enabling the DHCP server, you need to configure a range of subnet IP addresses.
In my case I am going to use this subnet IP addresses for my Raspberry Pi nodes. I am using the Synology as my home DNS server, so the Primary DNS is configured to the Synology IP address. In your case, you should configure this to your existing DNS server.
In the Vendor screen, create a new vendor settings with 43 for Raspberry Pi Boot values.
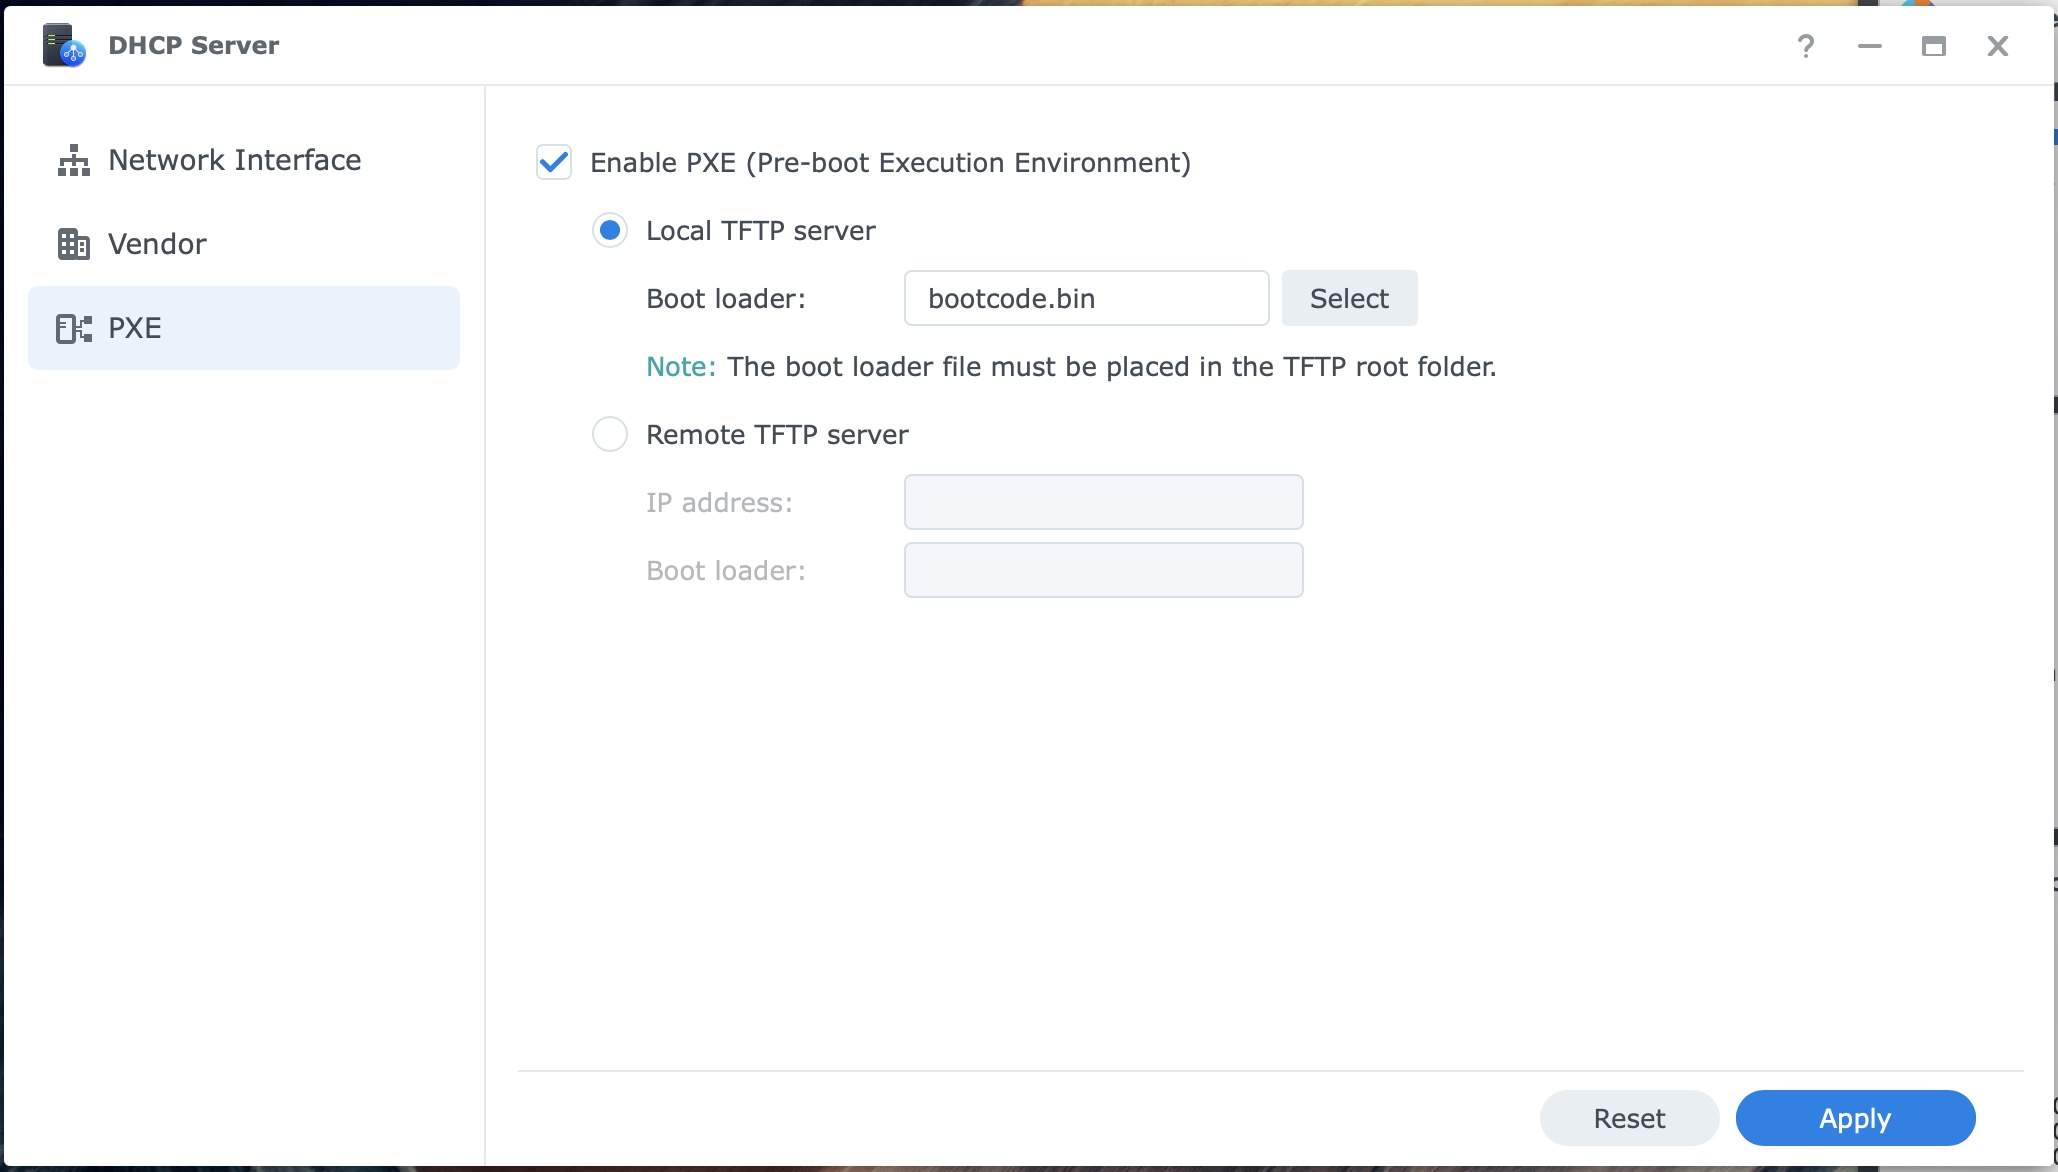
In the PXE screen, click on the checkbox to enable PXE and select the Local TFTP Server option. You can ignore the Boot Loader value. We do not need to place bootcode.bin in the rpi-tftpboot root directory. The PXE will lookup for the bootcode.bin from each of the folder that we will create named after the RPi serial number later on.
Install Ubuntu Server on Raspberry Pi
Download the Ubuntu for Raspberry Pi installer from Ubuntu website. I am using Ubuntu Server 20.04. You can use the Raspberry Pi Imager to burn the OS onto your SD card and boot the Raspberry Pi as usual.
Refer the Ubuntu Server Raspberry Pi installation guide here.
Copy /boot Directory to rpi-tftpboot NFS folder
Once you have booted up the Ubuntu, ssh into the server to copy the /boot folder onto the NFS share drive we created earlier.
Note: Booting Ubuntu on RPi 4 requires patient. It will take some time for the system to boot completely and ready because of the cloud-init. You really need to wait until it is fully completed as per described here.
ssh into the Ubuntu and install the nfs-common to allow us to mount to the NFS shared folder using NFS client.
sudo apt-get install nfs-commonAt the storage server side, we need to create a sub-directory in the NFS share drive for the specific Raspberry Pi node. We will create a folder name after the RPi 4 serial number under the rpi-tftpboot share drive.
At the end of the day, we will have multiple folders with each corresponding serial numbers at the rpi-tftpboot shared driver.
For example if the serial number for the specific Raspberry Pi is b153d618. We will then create the folder and mount the NFS shared drive on the local Ubuntu SD card and start copying the /boot directory to the directory named b153d618.
# create the local mount directory
sudo mkdir /media/boot

# mount the NFS drive
sudo mount <storage server ip>:/volume1/rpi-tftpboot/b153d618 /media/boot

# copy the boot dir
sudo rsync -xa --progress /boot /media/boot/
Touch Up Some of The Files on the NFS Share Drive
Because of the way how Ubuntu boot loading is different from Raspberry Pi OS, we need to adjust a little bit on the boot loading files in the shared drive we had just created. You can run the following command inside the /media/bootdirectory.
# Restructure some of the files location.
cp -a firmware/start4.elf ./start4.elf && \
cp -a firmware/bcm2711-rpi-4-b.dtb ./bcm2711-rpi-4-b.dtb \
&& cp -a firmware/config.txt ./config.txt \
&& cp -a firmware/usercfg.txt ./usercfg.txt \
&& cp -a firmware/syscfg.txt ./syscfg.txt \
&& cp -a firmware/cmdline.txt ./cmdline.txt \
&& cp -a firmware/fixup4.dat ./fixup4.dat

# make sure the ownership is root:root
sudo chown root:root start4.elf bcm2711-rpi-4-b.dtb config.txt usercfg.txt syscfg.txt cmdline.txt fixup4.dat
We also need to uncompress the vmlinuz kernel file.
# Double check the the compressed file is with offset `0000000`
sudo od -A d -t x1 vmlinuz-5.4.0-1045-raspi | grep '1f 8b 08 00'

0000000 1f 8b 08 00 00 00 00 00 02 03 ec 5c 0d 74 14 d7

# Uncompressed the `vmlinuz-5.4.0-1045-raspi`
zcat vmlinuz-5.4.0-1045-raspi > vmlinux-5.4.0-1045-raspi
Modify the config.txt with the following changes. Make sure the kernel value is configured with the correct name and version number from the above.
[pi4]
# kernel=uboot_rpi_4.bin
max_framebuffers=2

[pi2]
# kernel=uboot_rpi_2.bin

[pi3]
# kernel=uboot_rpi_3.bin

[all]
arm_64bit=1
device_tree_address=0x03000000
kernel=vmlinux-5.4.0-1045-raspi
initramfs initrd.img-5.4.0-1045-raspi followkernel
Change the cmdline.txt with the following details. Note the rpi-pxe/kube1 shared folder, this will be the shared folder that we are going to create in the next step.
net.ifnames=0 dwc_otg.lpm_enable=0 console=serial0,115200 console=tty1 root=/dev/nfs nfsroot=<storage server ip>:/volume1/rpi-pxe/kube1 elevator=deadline rootwait fixrtc rwCopy Ubuntu OS files to rpi-pxe NFS Drive
We need to create a folder named kube1 in the NFS share folder rpi-pxe. This could be any name that make sense for you, it does not have to be kube1 as in my case. Make sure this folder name is the same as configured in cmdline.txt above.
Copy the complete Ubuntu OS filesystems to this newly created share folder.
# create the local mount directory
sudo mkdir /media/root

# mount the NFS drive
sudo mount <storage server ip>:/volume1/rpi-pxe/kube1 /media/root

# copy the root dir. Will take some time to complete. Grab a coffee!
sudo rsync -xa --progress / /media/root/
Update the fstab file in the share folder just copied over for kube1.
Updated 20-03-2023: Added the /boot mount entry required in fstab
<storage server ip>:/volume1/rpi-pxe/kube1   /       nfs     defaults,rw,nolock   0  0
tmpfs   /tmp    tmpfs   defaults    0   0
tmpfs   /var/tmp    tmpfs   defaults    0   0
tmpfs   /var/run    tmpfs   defaults    0   0
<storage server ip>:/volume1/rpi-tftproot/bc6ea0c3 /boot nfs defaults,rw,nolock 0 0Note: I think the entry for <storage server ip>:/volume1/rpi-pxe/kube1 is not required in the fstab since we have already define this in the cmdline.txt earlier.
Test The PXE Boot Raspberry Pi
Once you have done, shutdown the Raspberry Pi and power off. Remove the SD card and boot the Raspberry Pi over the network.
At this moment, it is best that you have monitor connected to the Raspberry Pi so that you will be able to know what is going on with the booting process. This also give your visibility of what is the error message on screen is something is not right.
Once everything is fine. You can repeat the same process for all the other Raspberry Pi nodes that you intended to boot from network drive.
I basically just make a copy of the first node for each folder under rpi-pxe and rpi-tftpboot. I use that as a golden copy for all the sub-sequence nodes configuration.
Bumps to Watch Out
Mistake happens. Some tips to make sure you would not repeat the mistakes that I have gone through.
- Copy the
/bootand the OS filesystem using-aparameter to maintain all the file permissions and attributes. Use-xto avoid crossing filesystem boundaries while copying files. - Make sure you have copied all the required boot loader files into the root directory of the rpi-tftpboot/<serial> folder, as mentioned in this section.
- Ensure the NFS server IP address is correct and the mount points for each
rpi-pxeandrpi-tftpbootis correct for each node. When you have more nodes coming in, mistake tends to happen. I once boot node A into node B boot loader. Make sure you double check the Raspberry Pi serial number is correct. Label your Raspberry Pi with IP address, serial number and node name if possible. - If you intended to use this PXE boot approach for Kubernetes (which I will be covering in the next post), make sure you have tried the first node with completed Kubernetes installation. There will be additional network and node configuration that we need to do for Kubernetes installation. Once you have a stable OS with Kubernetes installation, then it will be more meaningful to create the golden copies for the boot loader and OS filesystems.
Summary
This concludes the steps required to configure PXE boot for Ubuntu on Raspberry Pi 4. In the next post, I am going to cover Kubernetes installation on Raspberry Pi 4.
Thank you very much for your post, I was finally able to install ubuntu 22.04 via PXE, I have some comments I would like to make:
– On the commands
sudo rsync -rxa –progress /boot /media/boot/
and
sudo rsync -rxa –progress /pxe /media/pxe/
– I have to add the -r and exclude /media (where the files was mounted) and /proc/kcore (huge file):
sudo rsync -rxa –progress /boot/
and
sudo rsync -xar –progress –exclude=/media –exclude=/proc/kcore / </media/root<
– Disable cloud init because block my login (terminal and ssh)
sudo touch /etc/cloud/cloud-init.disabled
Thank's
Luis, glad that this helps. Thanks for the feedback,
On Ubuntu 22.04 there isn’t a usercfg.txt in the firmware directory. Any idea how to overcome this?
Also on that note, with moving those files out of the firmware directory, isn’t there a risk that later on if they get updated you will still be using the old files because the new ones will be inside the firmware directory?
Hi Josh,
The usercfg.txt seems to be an empty file in my own setup. So I think it is safely ignorable if it is not there.
Once we copied over the content for `/boot` directory, we need to configure the `/etc/fstab` to always mount `/boot` to the remote storage. I just realised that this is missing in the post. I had updated for the mistake. Thank you for letting me know.
However, bear in mind that when you performs the `apt upgrade`, you will encountered some warnings and errors. I usually ignore the warnings.
If you encountered the following error during OS upgrade:
Errors were encountered while processing:

 u-boot-rpi:arm64

E: Sub-process /usr/bin/dpkg returned an error code (1)
Delete the package and run the `apt upgrade` again.
sudo apt remove u-boot-rpi:arm64
Also, we need to manually update the `/boot/config.txt` to point to the latest files
[all]

arm_64bit=1

device_tree_address=0x03000000

kernel=vmlinux-5.4.0-1080-raspi

initramfs initrd.img-5.4.0-1080-raspi followkernel
Thank you that makes sense because in this tutorial you have uncompressed the kernel and directly pointed to it so if there are kernel updates they will be skipping over this requirement.
My next question though is do you know why uncompressing the kernel is necessary or if there is any way to avoid it? I’m at the point of the rainbow screen myself because I haven’t uncompressed my kernel. If the rpi can run with a compressed kernel from SD card or USB then shouldn’t it be able to do it via netboot too?
Hi Josh,
Seems like RPI cannot boot from external if the kernel is in compressed mode. This forum seems discussed them well: https://forums.raspberrypi.com/viewtopic.php?t=278791&start=25
And I just notice there is a script that you can create to help you to automate the decompression, maybe you can give it a try and let me know whether it works: https://krdesigns.com/articles/Boot-raspbian-ubuntu-20.04-official-from-SSD-without-microsd
I not dare to touch my RPIs now because they are like “production” to me, and no spare RPI to test now.
I’ll definitely keep looking into this and see what I can find. There is some good information there but I feel it might be updated as it’s all from 2020. In 2022 onwards (when I started dabbling with USB boot for raspberry pis) you don’t need to uncompress the kernel for USB boot, it just works after flashing to an SSD with a USB to SATA cable straight away which makes me very curious about why it doesn’t work natively over the network. I feel like it should work but I’m no expert on this.
If you find any information let me know and if I find an answer I’ll let you know for sure!
Nice post – my blog is one of your references 🙂 I got here looking for info on netbooting 22.04 on RPi4 – not sure if you managed to netboot Ubuntu 22.04 or not – I found that I could not extract the vmlinux without calculating the offset first – so:
od -A d -t x1 /boot/vmlinuz-$(uname -r) | grep ‘1f 8b 08 00’
This shows the output (for me):
0060608 75 6c 6c 29 00 1f 8b 08 00 00 00 00 00 02 03 ec
offset | 5 octets | pattern
The offset is then the 60608 + the number of octets before the pattern (‘1f 8b 08 00’) – in this case there are 5 octets, so 60608+5=60613
Then I can read out with dd into zcat using this offset to skip:
dd if=/boot/vmlinuz-$(uname -r) bs=1 skip=60613 | zcat > vmlinux-$(uname -r)
The only line i changed in my config.txt is then:
kernel=vmlinux-5.15.0-1033-raspi
Instructions were found here: https://ubuntuforums.org/showthread.php?t=1284244&p=8062401#post8062401
great info. thanks for sharing, this will help those who have the same problem as yours. i have no problem extracting the kernel as usual, but need to find a better way to manage this over manual upgrades procedure. netboot works for my PIs. i have 8 PIs k8s cluster with netboot running since this post, on cheap storage and occasionally crashed due to power outage of human error 🤣. thanks to your post! great help!