
Overview
The pandemic has created situation where companies need to adapt to the new norm by empowering employees to work remotely to ensure the business continues to run. What this means to application team is they must find a better way to work as individual remotely at the same time collaborates as a team to continue to deliver the applications.
Before application implementation starts, the application team must be able to work on the application design collaboratively. One of the crucial part of the application design is the API design, which most of time APIs play a key role in keeping together all the other application modules integrated.
There are many tools out there for REST API design but today I would like to cover an open source tool called Apicurio Studio which is a web based API design studio primarily built to support design-first REST API development.
Apicurio Studio integrates with Microcks, another open source tool that provides API mocking and testing. This integration is important to allow the application team to be able to perform API mocking and testing before passing the API designs to the developers for actual code implementation.
What is Apicurio Studio?
Apicurio Studio is a web based API Design suite, primarily (but not exclusively) built to support design-first REST API development. It provides a way for users to collaboratively and visually design their APIs prior to (or concurrent with) the implementation.
Apicurio Studio is under the bigger umbrella of Apicurio community project sponsored by Red Hat.
With Apicurio Studio, you do not need to know the OpenAPI specification inside-out in order to design the API. It provides web UI that is easy to use where now you can design and implement your REST API complies to OpenAPI standards.
It is a fully open source project developed by the community and hosted on the GitHub.
What is Microcks?
Microcks is a platform for turning your API and microservices assets such as OpenAPI specs, AsyncAPI specs, Postman collections and SoapUI projects into live mocks in seconds. In here, the mocking allows you to test and verify your API specification and design is meeting your API requirement.
It also reuses these assets for running compliance and non-regression tests against your API implementation. Microcks also provide number of integrations with CI/CD tools such as Jenkins, Tekton and many others through a simple CLI.
Microcks is available as open source community project at GitHub.
Overview of Installation
Apicurio Studio
There are few options to kick start your Apicurio Studio journey. You can start using Apicurio Studio by running it as container using Docker or deploy it onto OpenShift.
To try out the Apicurio Studio, you can run the Apicurio Studio Quickstart or heads to the live Apicurio Studio hosted on Apicurio website.
You may choose to install your own Keycloak server and configure the Keycloak for your Apicurio Studio. Microcks support MySQL and Postgresql as the database, you can choose to install a one of this database and configure the database for Apicurio Studio.
Microcks
You can choose to install and run Microcks with the following approaches:
- Kubernetes – You can install Microcks on Minikube or any supported Kubernetes distribution. There is Helm 3 chart provided for installing Microcks onto Kubernetes.
- Kubernetes Operator – Microcks provide an Operator that was developed using the Operator Framework SDK and that is distributed through OperatorHub.io. You can use this operator to install Microcks on OpenShift 4 or other Kubernetes distributions.
- Docker-Compose – For those of you familiar with Docker Compose, a docker-compose file is available within GitHub repository and can be used to rapidly try out Microcks.
Once you have the Apicurio Studio and Microcks installed and running, we will look at how can we integrate them together, which is pretty straightforward.
Since I am running both Apicurio Studio and Microcks on my laptop, I need to change the default port for one of the server to avoid port conflict during the installation process. For my case, I installed Apicurio Studio first then followed by Microcks. So I decided to change the default port for Microcks. Changing which server default port does not matter as long as you make sure they are configured accordingly.
Installing Microcks
To simply things, I am using Docker-compose approach to install Microcks and run the necessary servers as Docker containers. Before you proceed to run the docker-compose command. There are some configurations that you will need to change. Please read on to follow the steps.
1. Proceed to clone the Docker-Compose files from Microcks Github.
git clone https://github.com/microcks/microcks2. From the command prompt, change directory to /{MICROCKS_ROOT}/install/docker-compose.
3. Change the docker-compose.yml file content with Microcks port as 9080 and the values for environmental variables KEYCLOAK_URL and KEYCLOAK_FRONTEND_URL to http://docker.for.mac.localhost:18080/auth. Note that I am using MacOS. If you are using windows, please change it to http://docker.for.win.localhost:18080/auth. Over a few tests, I notices KEYCLOAK_PUBLIC_URL is not in used at all, so you may ignore it, correct me if I am wrong.
Refer the following for the updated docker-compose.xml.
version: '2'

services:
  mongo:
    image: mongo:3.4.23
    container_name: microcks-db
    volumes:
      - "~/tmp/microcks-data:/data/db"

  keycloak:
    image: jboss/keycloak:10.0.1
    container_name: microcks-sso
    ports:
      - "18080:8080"
    environment:
      KEYCLOAK_USER: "admin"
      KEYCLOAK_PASSWORD: "admin"
      KEYCLOAK_IMPORT: "/tmp/microcks-realm.json"
      KEYCLOAK_FRONTEND_URL: "http://docker.for.mac.localhost:18080/auth"
    volumes:
      - "./keycloak-realm/microcks-realm-sample.json:/tmp/microcks-realm.json"

  postman:
    image: quay.io/microcks/microcks-postman-runtime:latest
    container_name: microcks-postman-runtime

  app:
    depends_on:
      - mongo
      - keycloak
      - postman
    image: quay.io/microcks/microcks:latest
    container_name: microcks
    ports:
      - "9080:8080"
    environment:
      - SPRING_PROFILES_ACTIVE=prod
      - SPRING_DATA_MONGODB_URI=mongodb://mongo:27017
      - SPRING_DATA_MONGODB_DATABASE=microcks
      - POSTMAN_RUNNER_URL=http://postman:3000
      - TEST_CALLBACK_URL=http://microcks:9080
      - SERVICES_UPDATE_INTERVAL=0 0 0/2 * * *
      - KEYCLOAK_URL=http://docker.for.mac.localhost:18080/auth
      - KEYCLOAK_PUBLIC_URL=http://docker.for.mac.localhost:18080/auth
4. Modify the keycloak-realm/microcks-realm-sample.json to update the microck-app-js to reflect the port number that we have updated for Microcks in the earlier step. Refer the following for the detail.
{
      "name": "microcks-app-js",
      "enabled": true,
      "publicClient": true,
      "webOrigins": [
        "+"
      ],
      "redirectUris": [
        "http://localhost:9080/*"
      ],
      "fullScopeAllowed": false
 },
Notice the username and password for Microcks in this Keycloak realm config file.
"users" : [
    {
      "username" : "admin",
      "enabled": true,
      "credentials" : [
        { "type" : "password",
          "value" : "123" }
      ],
      "realmRoles": [],
      "applicationRoles": {
        "realm-management": [ "realm-admin" ],
        "account": [ "manage-account" ],
        "microcks-app": [ "admin "]
      }
    }
  ],
5. Make sure you have Docker installed and run the following command in the docker-compose directory to deploy the necessary Docker containers.
docker-compose up -d6. Do a docker ps command to verify the containers are deployed and running. Please note Keyclock will take a little extra moment to start up.

7. Enter http://localhost:9080 at your browser. This should bring you to the Microcks login page. Login using credential admin/123 which is configured in the Keycloak.
Note:
- You can also use podman to run the containers. I am not able to test the podman approach because I am using MacBook. Leave me a feedback on this website to let me know how it goes if you have tried podman approach.
- The development is happening fast at the open source community. The GitHub project content used in this article may have changed since this article is written. You can always refers to the latest documentation here.
Installing Apicurio Studio
For quick try out, I decided to just download and install the Apicurio Studio Quickstart. Note that this Quickstart is using the cloud version of Keycloak for authentication.
Basically you will just need to unzip and run the command to start the server. You can download and unpack the Apicurio Studio Quickstart from here.
Let’s proceed to the next section before we proceed to start the Apicurio Studio server.
Integrating Apicurio Studio and Microcks
The benefit of integrating Apicurio Studio and Microcks is that you can seamlessly have the REST API design created in the Studio available in Microcks for immediate API mocking and testing. This is a tight integration between Apicurio Studio and Microcks.
The other option is to integrate Apicurio Studio with source control server such as GitHub and push the committed API design document to GitHub. You can then import the design document from the same GitHub repository to Microcks. Any changes committed to the GitHub from Apicurio Studio will be synchronised and available in Microcks.
The following provides the summary of options to enable the content sharing between Apicurio Studio and Microcks:
- Export the API design document from Apicurio Studio and then import the document into Microcks. This is the less prefer way with poor user experience especially when we are working as teams with many projects or API designs are going on.
- Enable integrate with source control server such as GitHub for both Apicurio Studio and Microcks which changes committed by Apicurio Studio will be immediately seen by Microcks.
- Enable the integration between Apicurio Studio and Microcks. This will enable a button on Apicurio Studio API web page to synchronise the API designs and changes to Microcks. This is the approach that I am going to cover in this section.
Let’s proceed with the integration configuration.
1. Enter the following URL at your browser to goto Microcks Keycloak server and login with credential admin/admin as per configured earlier.
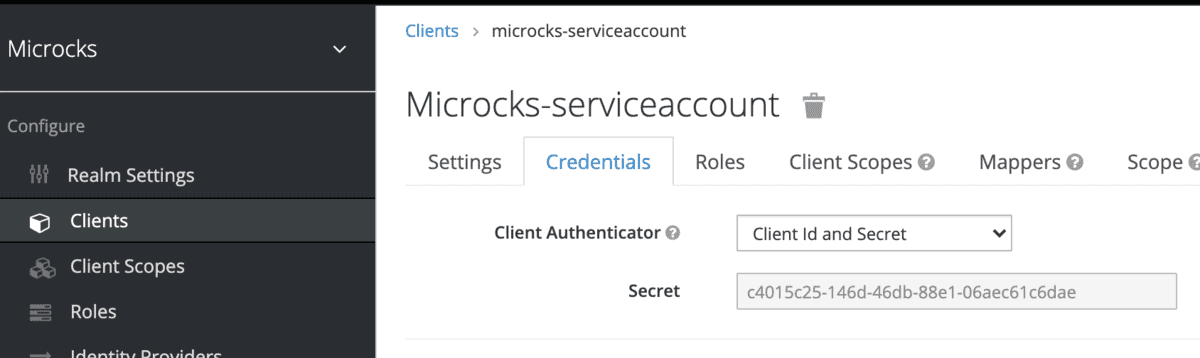
http://docker.for.mac.localhost:18080/auth/realms/master/2. Browse to Clients -> microcks-serviceaccount -> Credentials. Copy the secret value somewhere to be used in the later step.
3. To enable the Microcks on Apicurio Studio UI, you can either set the following environment variables using the Java parameter when you starts the Apicurio Studio server:
-Dapicurio-ui.feature.microcks=trueor, you can set the environmental variable at the command prompt before your start the server.
export APICURIO_UI_FEATURE_MICROCKS=true4. Apicurio Studio performs all the integration operations using the Microcks API. Microcks API is secured with Keycloak OpenID. In order to enable the integration, you will need to configure the Keycloak clientid and clientsecret, on top of the Microcks API url. You can set the environmental variables via the Java command parameters:
-Dapicurio.hub.microcks.api=http://localhost:9080/api
-Dapicurio.hub.microcks.clientId=microcks-serviceaccount
-Dapicurio.hub.microcks.clientSecret=c4015c25-146d-46db-88e1-06aec61c6dae
or, you can do this via the export command:
export APICURIO_MICROCKS_API_URL=http://localhost:9080/api
export APICURIO_MICROCKS_CLIENT_ID=microcks-serviceaccount
export APICURIO_MICROCKS_CLIENT_SECRET=c4015c25-146d-46db-88e1-06aec61c6dae
5. Fire up the Apicurio Studio. Goto the command prompt and change to the root directory of where you have uncompressed the installer. I prefer using Java parameter for the environmental variables with the following command syntax:
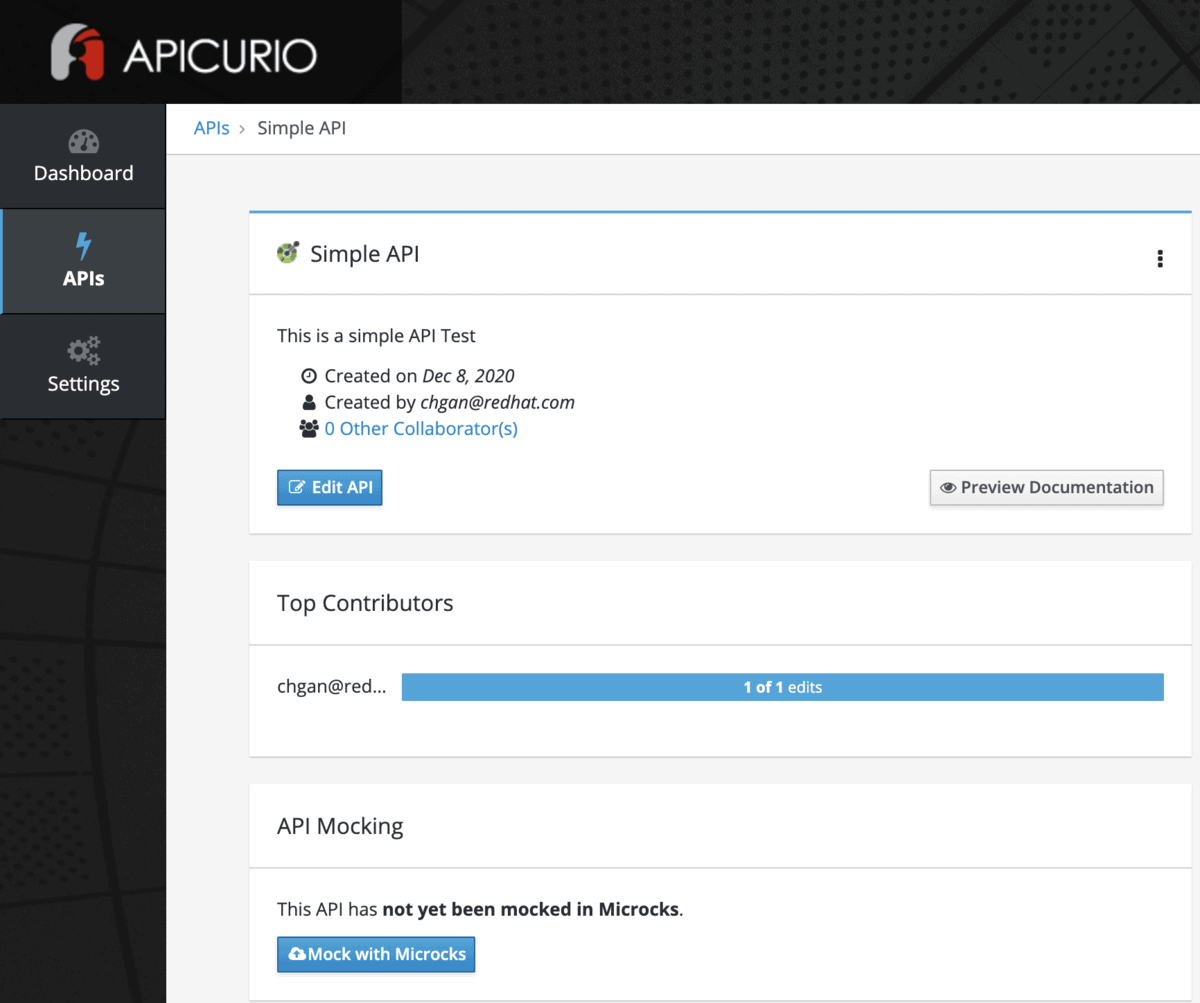
./bin/standalone.sh -c standalone-apicurio.xml -Dapicurio.hub.microcks.api=http://localhost:9080/api -Dapicurio.hub.microcks.clientId=microcks-serviceaccount -Dapicurio.hub.microcks.clientSecret=c4015c25-146d-46db-88e1-06aec61c6dae -Dapicurio-ui.feature.microcks=true6. Assuming you already have an account created and with an API design project. After login to Apicurio Studio, you will be able to see the “Mock with Microcks” botton appears under the API Mocking section at the bottom of the API detail page. If all settings are good, you should be able to click on the button and synchronise the API design to Microcks.
Note: If you encountered the following error in Apicurio Studio console when synchronise the API design to Microcks, try to add the hostname into your OS hosts file pointing to your laptop IP address.
ERROR [io.apicurio.hub.api.microcks.MicrocksConnector] (default task-5) Exception while connecting to Keycloak backend: com.mashape.unirest.http.exceptions.UnirestException: java.net.UnknownHostException: docker.for.mac.localhost: nodename nor servname provided, or not knownAPI Design and API Mocking
I will save some words here. Please refer to my demo video published on youtube at below
Summary
There are many excitements happening in open source world recent years. I would say Apicurio community projects (including the Apicurio Studio) and Microcks are among those that provide many positive promises. Drive yourself to try out these two tools and please let me know what do you think about them at the comment section.